Bring the Outdoors Inside with Marvin Patio Doors!

Bring the Outdoors Inside with Marvin®

Bring the Outdoors Inside with Marvin

Marvin introduces more light and airflow into your home.

We all know how important sunshine (and good old Vitamin D) are towards maintaining good body and mental health. But did you know that aside from spending time outdoors, you can help bring that lovely sunshine and outdoor feel into your home as well? It’s true, and it can still help improve your overall health!

Humans are hardwired to be exposed to nature. What’s more, studies have shown that there’s a positive biological response that happens when we come into contact with nature, as well. You can bring the outdoors into your own home with Marvin – and this exposure to natural light can improve your health from head to toe!

Natural Light Improves Well-Being

Before we ever had lamps and lightbulbs, the sun was our primary source of light. As such, our biology revolves around the sleep/wake cycles we’ve established due to the natural rotations and guiding flow of the sun. This means that maintaining healthy levels of exposure to natural light is crucial to your overall health. Without proper sleep and access to natural light our immune systems can’t function at their best. Besides that, our energy is reduced, and we can find it harder to concentrate or remember things.  Now, we can try to get outdoors as much as possible, but the average person spends nearly 90% of their time indoors. With so many work-from-home arrangements, we need our lighting to work in our favor to keep ourselves feeling and thinking healthy! Thankfully, thanks to the many advances in window and door design, you can easily amplify your access to natural light in your home.

Enhancing Your Home with Natural Light

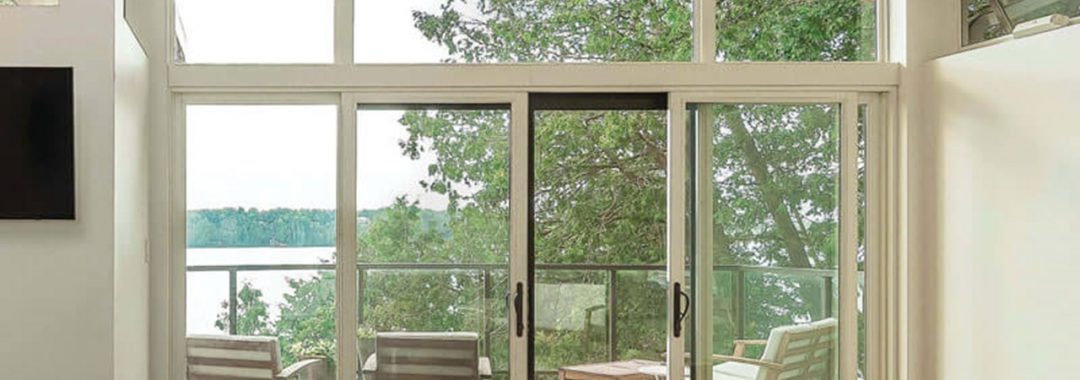
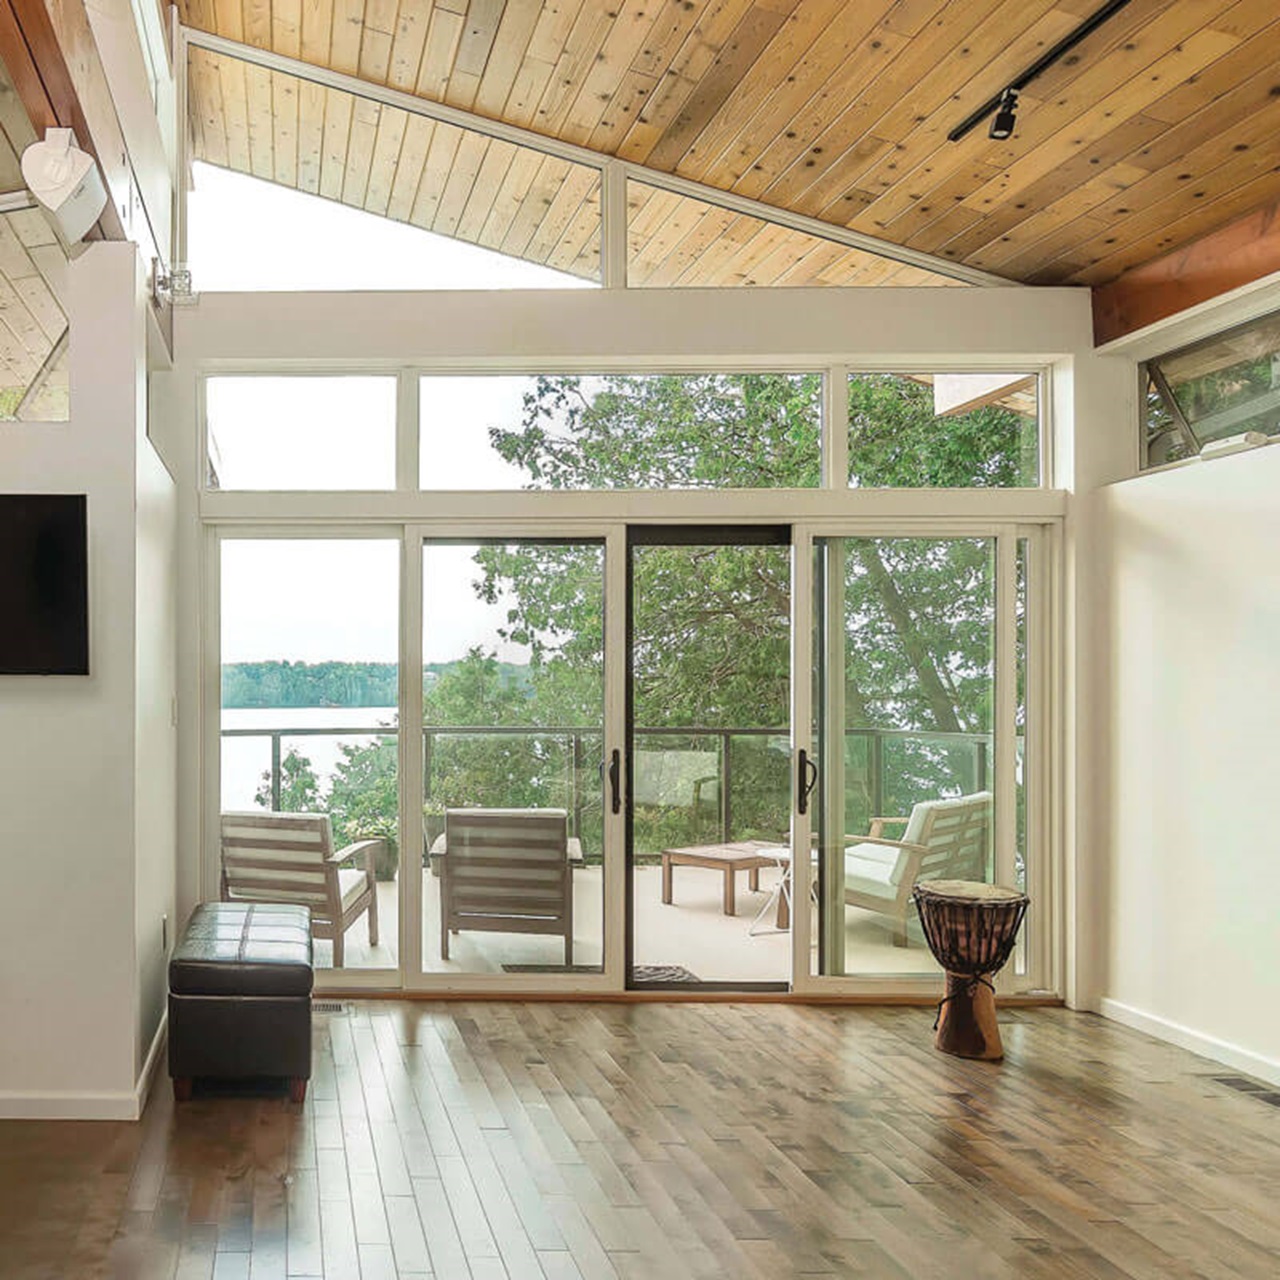
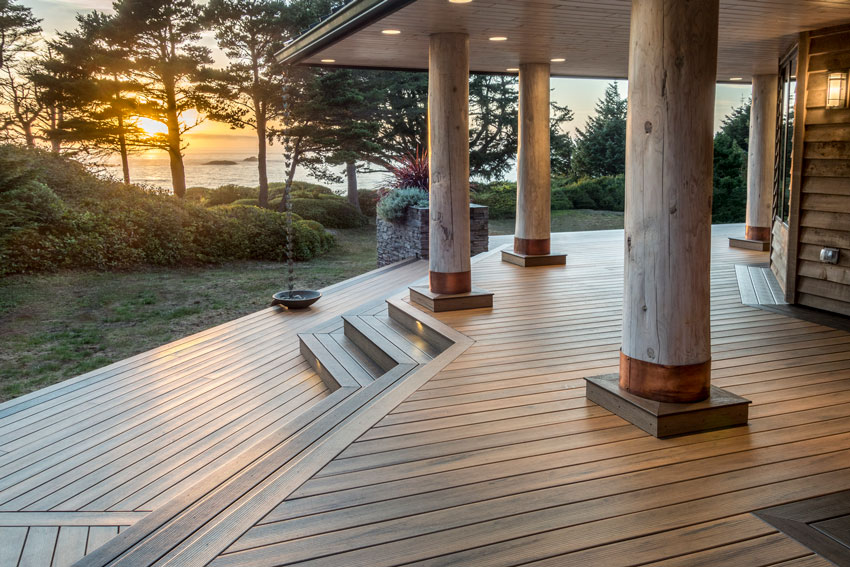
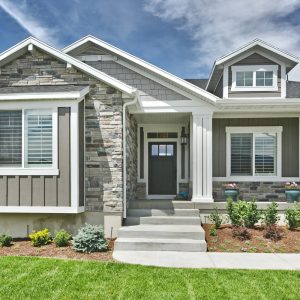
Your patio door can work with the rest of your design choices to create a sharp, healthy and workable light-filled home. Especially when you add Marvin to an existing or planned outdoor deck! Nowadays, most modern homes (and many recently remodeled homes as well) have more windows with narrower frames. This increases the capacity for light to pass through and offers better views, so a sliding patio door can add even more lovely, natural light.

Healthy home design revolves around ensuring our doors and windows and our exposure to natural light work hand-in-hand. We recommend choosing a Marvin brand patio door to not only increase your home’s comfort and functionality – but also improve its curb appeal! Marvin provides reduced sightlines, thanks to a large expanse of glass. That means your backyard views are always picturesque and stunning! This also enables you to achieve the optimal amount of sunlight in your home. So you can connect with the outdoors, restore your health, and feel free – even while indoors!

Add Natural Light with Marvin

Blend Looks for Indoor & Outdoor Chic

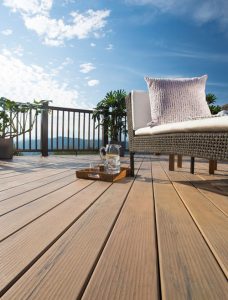
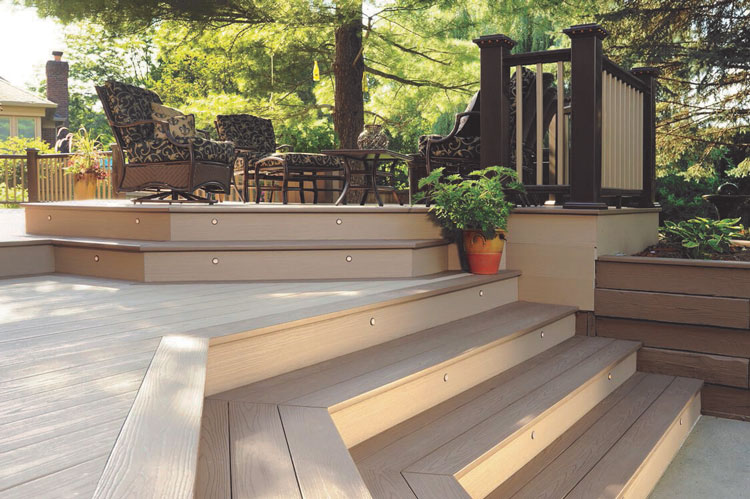
One of the best things about adding a Marvin to your home is how customizable they are – so they can complement any existing or planned deck/outdoor space!

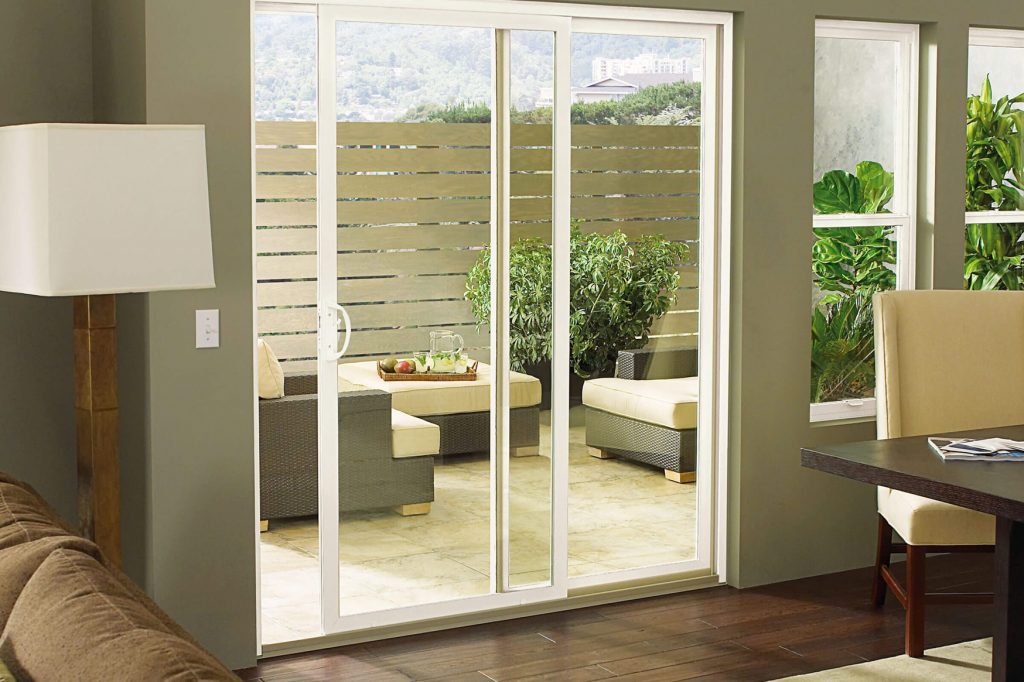
If you’re looking to create a sleek, modern patio for outdoor entertaining this summer – try the Marvin Signature® Ultimate sliding patio door! Featuring enhanced security features, heights of up to 16 feet, durable and weathertight performance, and personalized aesthetics and framing, it’s a great “plug-and-play” option for your next home remodeling project! We recommend pairing it with TimberTech AZEK Weathered Teak Decking to keep your deck cool while ensuring a sharp, contemporary look.

Don’t forget about the rest of your outdoor space as well! Having the entrance/exit from your backyard match the entire space only adds to its entire flow and feel. Try combining the clean lines and added visibility of a Marvin Essential sliding patio door with a stylish new TimberTech Paver pathway for added aesthetics! These products are not only incredibly customizable and easy to care for, but they can also improve the functionality of your home – inside and out!

It’s easier than you think to add to your home’s entire curb appeal with Marvin! They can improve the looks of your home – and can also protect it against the elements and keep your energy costs down! If you’re looking to improve your home inside and out, be sure to reach out to the talented team at GNH Lumber. We can help you find the best door and decking options for your home and ensure it’s installed successfully!

Painting Versus Staining

DIY: Staining Versus Painting Your Deck

Painting Versus Staining
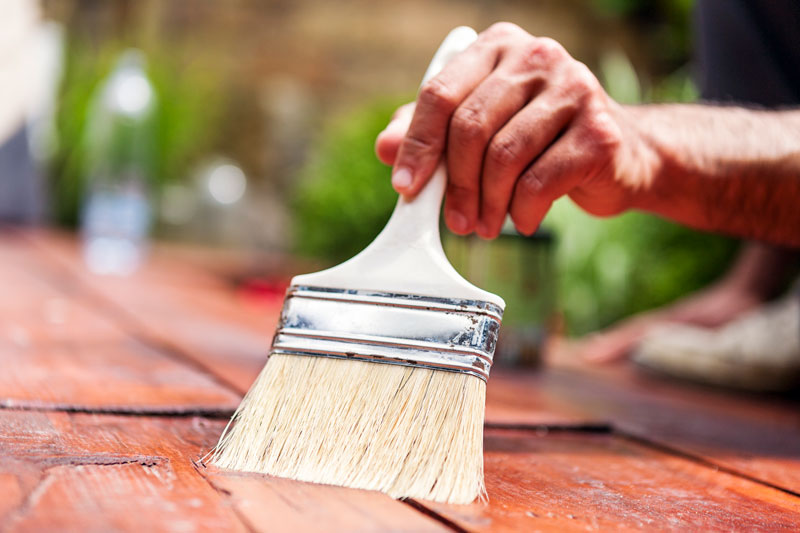
It’s the age-old question for deck care: staining versus painting? So, which is better for your deck, staining or painting? Simply put: it’s a matter of personal preference.

Whether you stain, paint, or simply just seal your deck, it is extremely important that you protect your deck with regular maintenance!

Is it Time to Paint or Stain? Try the Sprinkle Test

One of the easiest ways you can check to see if your deck needs a refresh is the sprinkle test! Simply sprinkle some water on the surface of your wood deck. If it beads up, wait a few days and try again to see if you get the same results. However, if the water sits and then absorbs into the wood, you’ll know it’s time to stain, paint, or seal it again.

Deck Stain Basics

Stains can make wood look amazing. They do a great job of highlighting the beauty of the natural wood grain. Many people prefer stain simply because it has a more natural look.

If you are using stain, you’ll have to do maintenance on your decking from periodically. The frequency of maintenance will depend on things where like you live, how much you use your deck, what type of weather you have, the color of the stain, quality of the stain, and the prep work that went into staining the deck. Therefore, it pays to do it right the first time.

Since there are both solid and semi-transparent stains, wear and tear will affect them differently. On average, a deck should be re-stained every few years in most cases to protect and preserve the wood.

What are Water and Oil Stains?

There are different kinds of stains to consider. You may see water-based stains, which can adhere to water or oil-based coatings already present on the deck surface, depending on the area. These stains are easily cleaned up with water as well.

However, oil-based stains will ONLY adhere to wood previously stained with an oil-based product. So, in this case you cannot layer paint or water-based stain over it without sanding off the old stain first. Oil-based stain can be cleaned up with paint thinner.

Deck Paint Basics

Paint is another common protective coating. If you choose to use paint, you won’t see the discoloration of the wood or any imperfections until the paint itself is removed. Although the required maintenance for a painted deck may be less, just like stain, it will depend on the location, the weather, and how much use your deck gets.

Also, when you select paint, you need to look for exterior deck/patio paint, which is formulated for outdoor weather and foot traffic. Don’t use the leftover paint you used to paint your bathroom!

Just know that in some areas of the country, or if the surface is not properly prepared and sealed, paint can flake. If that happens, you may find painting takes a lot of work to maintain. If you are wondering if this will be a problem, look at other exterior places that are painted and note their condition.

Understanding Sealers

Many don’t know you can get a clear sealant for your deck if you love the unique look of the wood. No matter what you choose to do, it’s always a good idea to make sure you reseal your deck once a year.

Whatever you decide, the team at GNH is here to help with all your painting and staining needs.

4 Ways to Create the Perfect Deck Retreat

Want to create a peaceful deck retreat? It’s fun and easy to transform your deck into a lounge that your family and friends will enjoy all season long! If you’re thinking of building a brand new deck, or rethinking your existing deck, GNH Lumber is ready to help you make your dream deck a reality! There’s a wealth of great decking producers out there – and with them you can create a deck that’s beautiful AND durable.

TimberTech® composite decking is an excellent choice for low-maintenance durability and style.  That’s because TimberTech® decks are durable enough for your family to enjoy for years, without the hassles of annual staining and sealing. They give their traditional capped wood composite decking the strength it needs to battle almost anything Mother Nature—or your family—throws its way. But they don’t sacrifice beauty for backbone.

Get your deck or porch project started!

Want to create a deck that will help you relax and regenerate? Well, get ready to light up the grill, kick back, and enjoy…

Here are 4 easy ways to create the perfect deck retreat:

1. Create a Corner Nook

If your deck has a corner, try assembling benches with throw pillows inside the cozy nook, or add comfy lounge chairs or even bean bags. These spaces are the perfect for comfort and will have your family and guests relaxing and chatting the day away!

No corners available? No problem! You can also screen off larger portions of deck with room-dividers or trellises covered with fabric to create custom corner nooks. The bonus of creating these custom nooks is that you can choose fabrics, plants or flowers that accentuate your deck color scheme.

Deck Retreat


2. Wrap Around Views

Decks that wrap around the second story of a home give tremendous access to views, and they create a feeling of spaciousness and peace. They’re the perfect place for late-night conversations or just secluded getaways to sit and think.

Decks like these can double as balconies for morning coffee. Plus, they provide as much aesthetic value from inside the home as they do from the outside. Never forget that a well-maintained deck is great for the valuation of your entire home as well!

Quick Tip: If your property has a great view of the mountains or your gardens, why not feature the view from a top story when planning the layout of your deck?


3. Keep the Sun at Bay

Shade for Deck Retreat

Adding a roof, pergola or awning to your deck, is another great way to create a cozy retreat. These kinds of structures or additions allow for lounging during parts of the day when sunlight is at its strongest. Creating cool, shady places to sit and sip a beverage or rock in a hammock is a great way to maximize deck usage. You can also use the covered patio below a second-story deck to introduce swinging hammocks and shaded benches.

Quick Tip: A roof provides the densest shade, while a pergola allows partial sun and a more open feel. Awnings provide partial shade, with the added benefit of being retractable or removable. They also come in materials that screen out the most harmful sunrays. The right awning can also enhance the overall look of your deck – there’s plenty of room for customization!


4. Use Soft Built-In Lighting

Dark evening deck? You can create a serene mood and add lighting at the same time! Try placing votive candles and string lights along the rail of your deck. Or, better yet, add LED lights to the decking itself! All of these options are easily installed, cost effective, and work wonders for adding a vibrant atmosphere to your deck – no matter how late it is!

Built-In Light for Deck Retreats
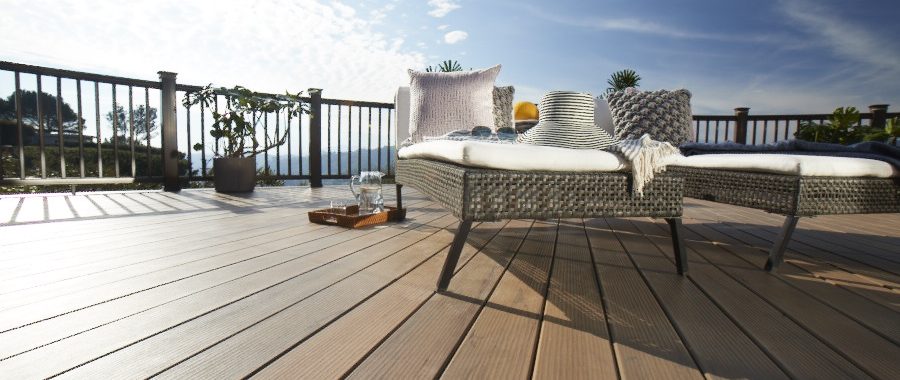
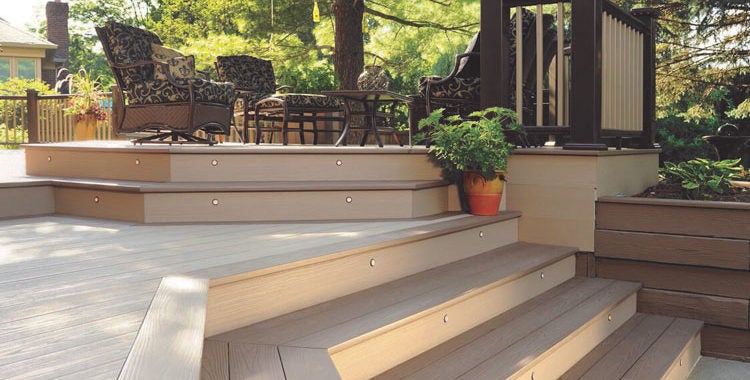
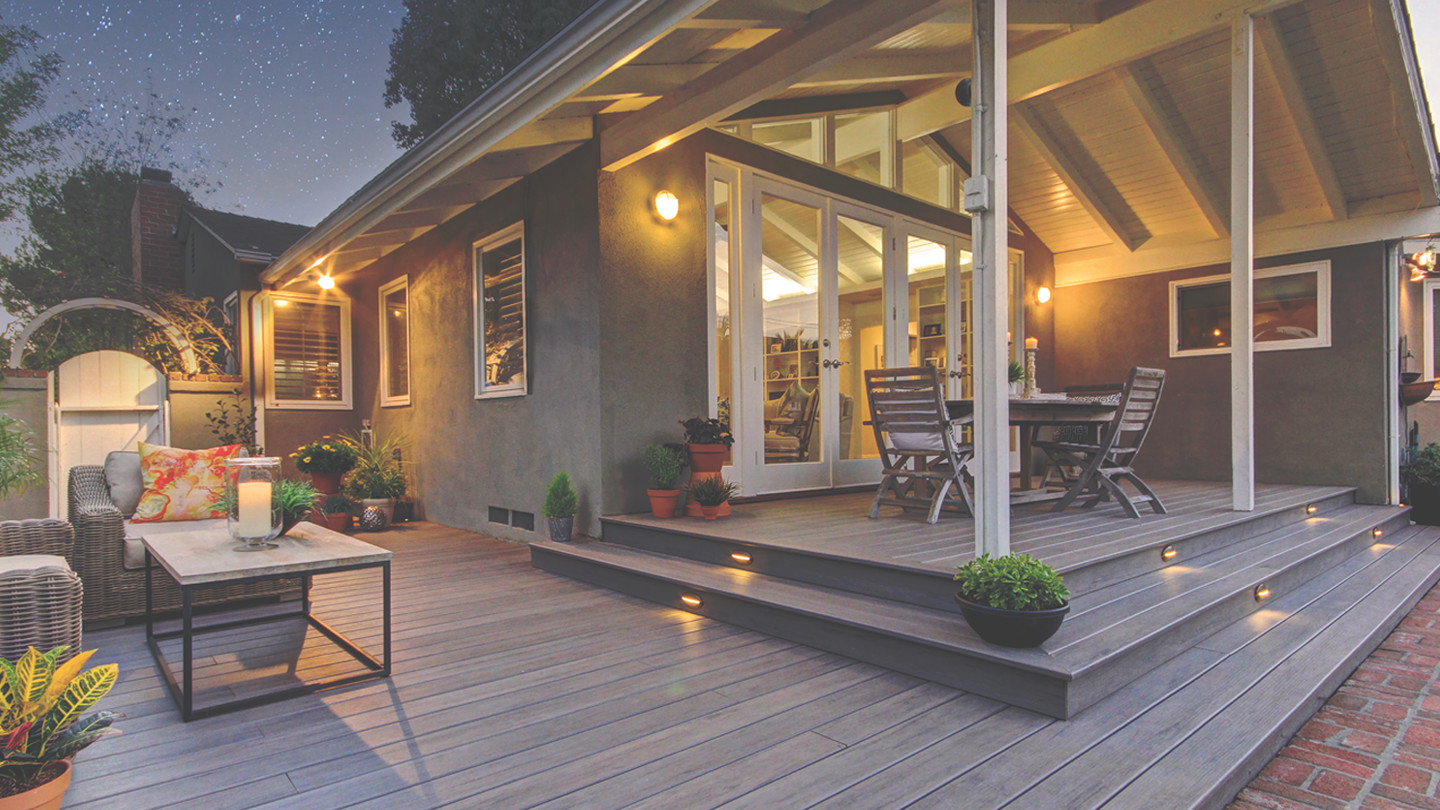
You can enjoy your TimberTech® Deck long after deck after dark with the subtle glow of low-voltage, energy-efficient LED lights in five functional styles. Each style creates a different dreamy effect on evening decks:
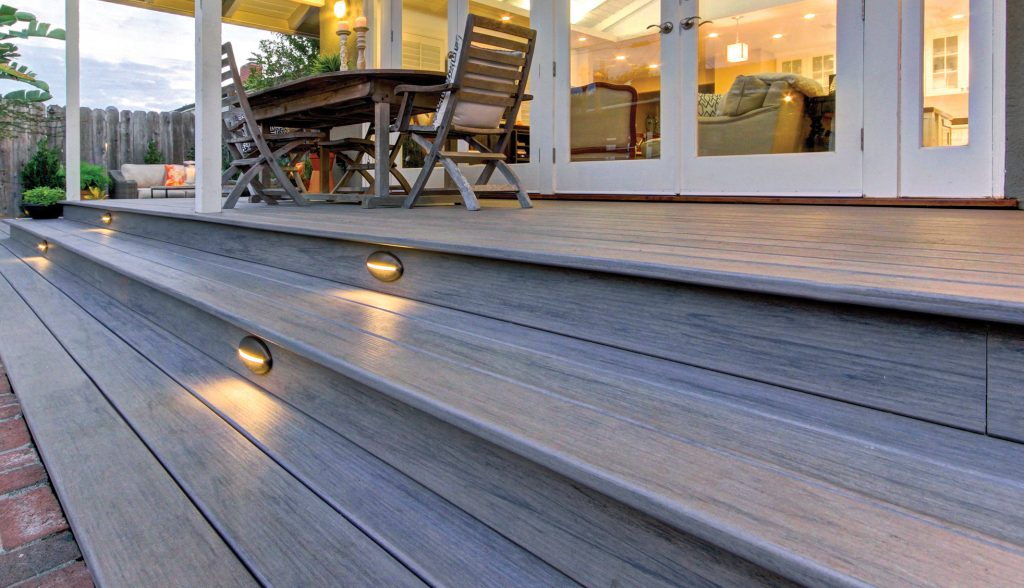
  • Accent Lights: Adding a delicate downlight effect on posts or near stairs with accent lights creates ambience and improves visibility.
  • In-Deck Lights: Mount in-deck lights to your deck’s surface for an ambient glow. Place them around your deck’s perimeter for outer glow and added safety.
  • Post Cap Lights: lluminate the edge of your deck with the soft glow of post cap lights. Add them easily to any TimberTech® RadianceRail® or RadianceRail Express® 4″ and 5″ posts.
  • Riser Lights: Add safety and a soft glow to your stairs with riser lights, warming the path up to your outdoor living space.
  • Under-Rail Lights: Enjoy the subtle downlight of under-rail lights, hidden between balusters in the underside of your TimberTech® top rail.

Soft Lighting for Deck Retreat

Have fun creating a peaceful deck retreat that’s all your own! If you ever need assistance, or just need more inspiration to craft your dream deck – get in touch with us! Our talented team is ready to help you today.


Source: https://timbertech.com/products/lighting

Winter Preparedness 101: Is Your Home Ready?

winter-preparedness

It’s fall season again. The leaves have fallen from most of the trees and the air is increasingly chilled. Like it or not, we all know that winter is close behind. Before the snow starts falling and temperatures drop, it’s a good time to think about things like:

  • Preparing your home for snowstorms
  • The cost of winter heating
  • Ways to improve your home efficiency

Is your home ready for the coming winter? Not yet? Not sure? Don’t know? Don’t worry! There are a few simple steps you can take each autumn to protect against damage from winter storms and create a more efficient home.

So, let’s start exploring some steps you can take right now to prevent those wintertime headaches:

Continue reading

Make Your Deck Cozy for Fall

5 Ways to Make Your Deck a Cozy Gathering Place This Fall

Make Your Deck Cozy for Fall

Fall is the perfect time to gather out on the deck and enjoy the crisp cool air. That means it’s time to transition your summer deck from a “fun in the sun” hotspot to a warm and cozy autumn hangout!

And here’s the good news: it doesn’t take much time, effort, or money to change the feel of your deck, and effectively reinvent it for the coming fall season.

Get your deck or porch project started!

Here are 5 easy ways to make your deck a cozy gathering place this fall:

1. Create a Focal Point

One easy way to give your deck a cozier feel is to create a visual focal point. Focal points encourage people to gather, chat and gravitate together in the space. This can be created by using an outdoor rug or a sitting area with a coffee table and comfy chairs. You can also use a stylish Chimenea or an outdoor fireplace to create a warm, inviting focal point

2. Make Large Areas Smaller

Pulling furniture closer together naturally makes people feel cozier. If your furniture is strewn out across the deck, try rearranging it into several smaller seating areas. Also, bring grills, benches and potted plants into tighter circles to improve this effect. You can also screen off larger portions of deck with room-divider screens or trellises covered with fabric to create cozy nooks.

3. Spice Up Your Space

If you want people to gather on your deck, then give them something fun to do!  The addition of a spa or hot tub might just be the thing that beckons everyone outside. Try adding stylish outdoor lighting or strings of outdoor lights to further enhance that cozy glow in the evening.

Remove canopy umbrellas, sun-lounging chairs and other remnants of summer. Then try placing sturdy, woodsy furniture, like Adirondack chairs and picnic benches. Add some large, cozy pillows to encourage people to kick back and relax.

4. Add Some Greenery

Cozy Deck Greenery for Fall

Adding plants is a quick and easy (and budget-friendly!) way to update your outdoor areas each season. Vines crawling up a pergola softens the space while adding interest. You can also create a splash of color with potted plants and seasonal flowers like goldenrod and chrysanthemums. This not only adds color and interest, it also gives you the flexibility to replace them depending on the occasion or your color palette.

3. Use Warm Colors

Summer means bright-colored plastic and garish, colorful decor. Fall calls for a more subdued, warm palette. Earthy tones like maroons, oranges and rusts. You can easily change out your color scheme by changing out cushions, accessories and carpets. Consider adding painted wood-furniture with deep-red and orange throws for snuggling under!

When making your deck the superstar of your cozy autumn gatherings, you’re only limited by your creativity and imagination! And don’t hesitate to stop by your local GNH Lumber for expert tips and guidance for your decking project.


Fall Deck Design TipsStop in to your local GNH Lumber for more tips and techniques for making your deck the gathering place of the season. We have outdoor furniture, lighting, Halloween decorations and other items to help you create a magical effect this fall!

Trending Textures for your Home’s Exterior

Gone are the days of boring, cookie-cutter style houses. Today’s homeowners are finding ways to express themselves by designing their homes in a way that reflect their style. One increasingly popular trend is mixing textures on your home’s exterior, which makes your home stand out among the rest.

How to mix textures

You’ll want to pick 2-3 different textures for your home’s exterior, and no more than 2-3 different colors. Too much variation will appear chaotic, so it’s important to be thoughtful about your choices.

You can take a drive around your neighborhood to get a sense of what you like, use online design tools like Cultured Stone’s Visualizer tool, or talk to our GNH design experts to get started.

Think about what focal points you want to stand out on your home— dormers, gables, porches, bump-outs, etc. Use contrasting colors and/or textures to draw attention to these features. You may also want to switch up the siding on different levels of your home.

Not ready for a remodel? You can start small by adding contrast with your front door, shutters or trim.

Using Cultured Stone for texture

One texture you’ll definitely want to consider using is stone. With so many colors and textures to choose from, the possibilities are limitless. You can also choose between using natural stone or a manufactured veneer, such as Cultured Stone veneers. There are a number of benefits of using Cultured Stone veneers. Cultured Stone is about one-quarter the weight of natural stone and is generally easier and less costly to install. Because of its light weight, Cultured Stone can be installed on a variety of substrates, unlike natural stone which needs to be fixed to something structural. Composed of lightweight concrete, Cultured Stone will last as long as other concrete materials, which can be anywhere from 50-100 years. Cultured Stone products are virtually maintenance-free and come with a 50-year limited warranty.

Some consumers may worry that manufactured stones will be too repetitive in appearance, but Cultured Stone uses thousands of individual molds and no two stones are ever cast with the same exact coloring. In fact, Cultured Stone has the largest variety of colors and textures in any manufactured stone line, with more than 20 textures available in over 100 color combinations. Check out some combinations below!

Echo Ridge Country Ledgestone      Credit: Symphony Homes

Artic Pro-Fit Terrain Ledgestone
Credit: Hearth and Home

Aspen Dressed Fieldstone & Aspen Country Ledgestone

These examples show how you can use different colors of Ledgestone to create vastly different styled homes. One the left you have Echo Ridge Country Ledgestone and an arts and craft style home, followed by a modern looking home in the middle with Artic Pro-Fit Terrain Ledgestone, and lastly the rustic log cabin style home with a combination of Aspen Dressed Fieldstone and Aspen Country Ledgestone.


Echo Ridge Dressed Fieldstone
Credit: Barrington Homes

This Echo Ridge Dressed Fieldstone gives the house a rugged and historic look like it has been here through the ages.

Gray Cobblefield


The Gray Cobblefield on this home is designed to mimic the architecture of 19th century rural America.

For more inspiration, visit the Cultured Stone Designs Gallery.

4 Deck Designs for Amazing Outdoor Spaces!

Amazingly Simple Home Deck Design Ideas!

4 Deck Designs for Amazing Outdoor Spaces!

Crafting the perfect deck for your home is about more than what materials you use. A backyard escape should also tell a story through design — and invite you to become lost in the narrative. When it comes to building and designing an outdoor deck, there is a lot of planning and design-making. To get your creative juices flowing, we’ve put together tips and advice on how to plan out your deck.

Planning a Perfect Deck

When you plan out your deck, you’ll need to determine the size deck you’d like, establish a budget, select material, and determine whether you want to build it yourself or hire a professional.  Here are some tips to ease the process along:

  1. Decide the deck’s purpose.
  2. Where are you building the deck?
  3. Check with your local zoning board to find out the building codes.
  4. Are you going to add lighting to the deck?
  5. Do you want built-ins or benches built into your deck?
  6. Determine what are the type of railings you want as this will be your deck’s most visible part.

Design Ideas

1) Herringbone Deck Patterns – This elaborate, fun design that brings a dynamic look to your deck surface. To create this look you repeat laying two deck boards at a 45-degree angle. You can use different deck board widths or colors to create an inspiring deck pattern. Herringbone pairs best with larger decks that have space for the pattern to repeat.

2) Picture-Frame Borders & Contrasting Hues –

A picture frame border refers to boards laid around your deck perimeter perpendicular to the inlay boards. Choose one, two, or three boards for your picture frame to give your deck as subtle or as bold of a border as you desire.

Use boards of a contrasting color to your deck surface for one or more of your border boards. This will create a truly striking and eye-popping perimeter!

Love a dynamic, high-contrast look? You can also combine white elements in your deck design with richly-hued modern composite decking for a dramatic effect. Choose white PVC trim for your fascia and stair risers to create a crisp, clean border against the saturated decking. A white composite railing with black balusters adds further contrast to the design.

3) Contrasting with Curves – Choose outdoor furniture that will complement your deck design. A curved, modular couch echoes the rounded cascading stairs while a dark frame and light cushions contribute even more contrast to an already dramatic design.

4) Wide Railing for Cocktails

– Your deck railing is more than tasteful decoration and added safety to your deck. One of TimberTech’s more fun products is the Drink Rail – part of the Classic Composite Series.  The Drink Rail features a deck board as the top rail to tie your deck and railing together seamlessly. Plus, it’s the perfect place to rest your morning coffee or late-night cocktail. It’s perfect for anyone looking for sharp designs that complement their deck AND home!

5)  Think Outside the Box

– Rounded decks feel organic and merge well with natural settings. They also create separate areas for cooking, seating, or housing a garden or hot tub. Try creating new and unusual decking patterns, such as basket weave, or alternating diagonals. Just remember – it’s your backyard space and your design, so don’t be afraid to try something new if it fits your budget.

6)  Wrap Around Views

– Having a deck that wraps around the second story of your home will give tremendous access to views. These decks can also double as balconies for morning coffee and are a great place for anyone in the family to sit. And they provide as much aesthetic value from inside the home as they do from the outside.

7) Combined Deck and Walkway – It is important to consider the transition between the deck and backyard. Adding a paved walkway leading from your deck helps to visually join a deck and garden or large lawn area. This allows you to introduce harmonizing colors and shapes to pull the deck and yard together. Even better it provides a much-needed safe path back indoors in case of inclement weather.

8) Added Shade – Adding a pergola, canopy or a shaded archway can create a one-of-a-kind outdoor living space. It also provides relief from the sun and offers a safe place to stay outside in the rain. You can introduce shady nooks, such as planting a wall of trees or using cornered walls of your home as a framework. You can also add hammocks and shaded benches to the covered patio below a second-story deck.

9)  Make a Playground Deck – Why should kids have all the fun? Turn your deck into a grown-up playhouse with built-in climbing walls, slides and more! Nothing brings a gathering of friends and family together like a chance to have some good-natured fun and feel like a kid again. Check out this cool playground deck highlighted on HGTV.com:

And don’t forget! The expert staff at GNH Lumber is ready to help you find the right home deck ideas and work through the process! At the end of the day, we want you to create the outdoor space of your dreams and stay within your budget. Place your order today for a beautiful outdoor living space tomorrow.

Looking for more deck design ideas and inspiration? Here are some of our favorite styles from TimberTech to help spark your imagination:

Sources: TimberTech Deck Design Options; TimberTech Deck Design Ideas;

How to Measure Windows

How to Measure Windows for Replacement

How to Measure Windows
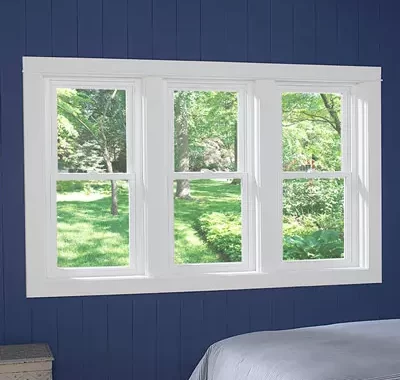
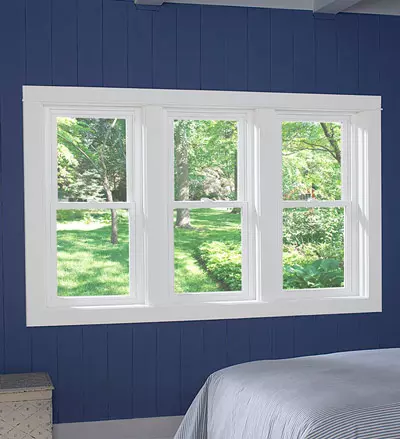
If you’re going to install replacement windows, it pays to measure windows correctly the first time and avoid the headache of placing an incorrect order.

How to Measure Windows 101:

  1. Always measure the entire window, not just the glass. This includes the frame and trim as well as the window glass.
  2. When recording measurements, follow the format “width by height.” For example, a window that is 63 inches wide and 27 inches tall is recorded as “63 x 27.” A window that is 37 inches wide and 55 inches tall is recorded as “37 x 55.” Record your measurements to the nearest 1/16 inch.
  3. Measure window width from the left edge to the right edge. Check this measurement in three places: the bottom, middle, and top. If these measurements are not equal, use the smallest as your width.
  4. Measure window height from the top edge to the bottom edge. Check this measurement in three places: on the left side, middle, and right side. If these measurements are not equal, use the smallest as your height.
  5. Take an additional set of measurements inside the window frame.
  6. Measure the width of the trim that surrounds the window. The trim on the sides may be different from the top and bottom – so measure each part.
  7. Measure the height and depth of the sill. If your windows don’t open, check if you have a door in the same wall where you can measure the wall’s thickness.
  8. Take a picture of a multi-paned window and record the measurements on the print to eliminate confusion. Record the overall window width and height, both inside and outside the frame. Measure and record the width and height of each window section and the measurements of any subsections. For example, the overall window may be 60 x 20, composed of two windows 30 x 20.

What’s the Next Step?

Bring your measurements and photos into GNH and talk to one of our window experts to help plan your replacement window order. Keep in mind that the windowsill’s height may be added to your window height to get the full size of the opening. When ordering replacement windows, we recommend ordering just slightly smaller than the opening. This allows for leveling and the application of sealant.

A helpful overview of the window replacement process from Marvin Windows:


Raised Garden Bed

DIY: How to Create a Raised Garden Bed

Raised Garden Bed

Spring is here! That means it’s time to start your gardening projects in time to have delicious, fresh veggies and herbs, or a bountiful flower garden all summer long!

Not enough space in your backyard for a big vegetable or flower garden? Raised garden beds are the perfect solution for gardeners with limited space!

In this blog, we’ll run through a step-by-step guide on how to create a raised garden bed for vegetables or flowers.

1. Choose Your Materials

Select your bed frame materials. This can be as simple as regular 2×4’s or even patio retaining wall blocks. The size is up to you!

The height of the bed should be at least 6 inches high, which gives the plants’ roots plenty of room to grow.


2. Mark the Perimeter

Once you’re done putting together your raised garden bed, it’s time to select a sunny spot ideal for growing and relocate the frame. Remember, if you’re growing vegetables, you need to find an extra sunny spot with plenty of late day sunlight.

Using an edger or spade, mark the ground around the perimeter of the frame.


3. Prepare the Soil

Now that you’ve created the frame and marked the perimeter, set it aside so you can start preparing the soil. Use a sod cutter or grub hoe to skim away the grass layer, if one exists.


4. Anchor the Raised Garden Bed

Once you’ve leveled it out, dig a 5- to 6-inch deep hole for each of the corner posts. Then sink each post into the ground, using a 4-foot level to level it out.


5. Add a Layer of Hardware Cloth to Keep Out Pests

Gophers and moles can sometimes be an issue with garden beds. To keep them out of your garden, add a layer of hardware cloth before you pour in your planting soil. Rake any existing soil at the bottom of the bed to level it out. Then smooth it out. Line the bed bottom with hardware cloth, making sure the cloth is flat against the bottom of the bed and touching each side. Secure the cloth by stapling it to the sides of the bed.


6. Add Your Soil

Fill the bed with a 50/50 mixture of planting soil and compost. Once the bed is full, rake the soil smooth and moisten it with a slight spray from the hose.


7. Plant!

Now it’s time to plant your vegetable, flowers and herbs! Plant anything you like that works in your area.


7. Water Regularly

Don’t forget to water your plants often! After all, you’ve spent a long time putting together your garden bed, so you want to make sure you are taking good care of your vegetables and flowers.


Now get started on your spring garden bed project, and start enjoying fresh produce and gorgeous flowers!

Lawn Before Lawn Repair

DIY: Lawn Repair 101 – How to Fix Bare Spots

Lawn Before Lawn Repair
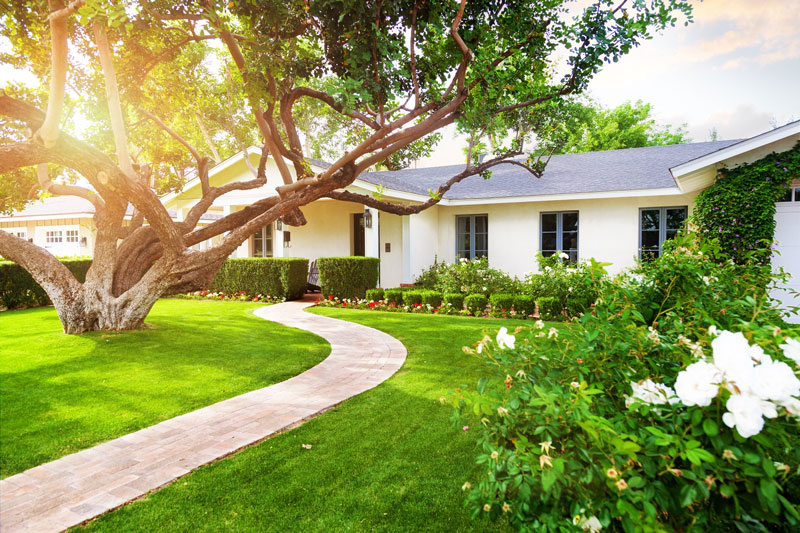
Ahhh! A lush lawn of perfect green! It’s what we all dream about when it’s summertime. The soft, rolling green backdrop to our cookouts, ballgames, BBQs and entertaining. That said, if you have a lawn with bald or bare spots, it can be frustrating to diagnose and fix.

Do I Need Lawn Repair?

It’s not uncommon to encounter bare spots at some point or another throughout the summer season. Take heart! There are easy ways to diagnose and repair these unsightly patches of yellow, brown and beige, and restore your lawn to its true GREEN GLORY.

A few common causes for those bare spots and patches in your lawn:

  1. Not enough water
  2. Over-fertilizing or spilled chemicals
  3. Lawnmower damage
  4. Grubs or other insects
  5. Pet damage or foot traffic

Depending on the type of damage, there are different solutions to your lawn’s bare spots. However, most involve adding new grass seed, lawn food and water (see steps below). Considering the unusually rainy spring and summer we’ve had so far in upstate New York, it’s doubtful that your lawn has bare spots due to dryness. But if there is a dry spot, it’s an easy fix – just be sure to water frequently, in addition to reseeding to improve thickness.

If the bare spots are due to overfertilizing or lawnmower damage, you will see them appearing uniformly across the lawn. For damage caused by overfertilizing, reseed the bare spots and do not add additional fertilizer until the lawn heals itself. For lawnmower damage, be sure your lawnmower blades are sharpened regularly, and keep the blades raised high enough from the ground when you mow.

Grubs or other insects can wreak havoc on your lawn, as well. Grubs, curling white worms, are a common problem in mid to late summer, and most easily identified when your sod easily pulls back from the ground like a carpet. More than ten grubs per square foot can cause lawn damage. Grub control products are available at your local GNH.

Pet or backyard animal urine can create bare spots of yellowed-grass with a brighter ring of green around them. These can be repaired following the steps below, but to prevent future damage you will want to train your pets to do their business elsewhere. Likewise, foot traffic must be redirected to allow these spots in your lawn to heal.

How to repair bare spots in your lawn the quick and easy way:


Supplies & Tools:

  • Grass Seed (we recommend Scotts® Turf Builder® seed varieties)
  • Topsoil or compost
  • Fertilizer (we recommend Scotts® Step-3 Lawn Fertilizer)
  • Small gardening trowel and rake

1. Break Up the Bare Spot and Reseed.

Use a small gardening shovel or rake to break up the dry spot on your lawn. Remove any rocks, leaves or debris. Choose the appropriate grass seed for the spot’s shade density (such as Scott’s Turf Builder seed varieties, available at GNH) and cast the seeds over the turf. Spread about a half an inch of compost or topsoil on the strewn seeds.

Tip: To get good seed-to-soil contact, gently rake the seeds and soil into the grass.


2. Water Generously at First, Less Later

Water the area immediately, and then continue to water lightly three times a day for 7-10 days. When you can see the new grass sprouting, reduce watering to once daily.

Tip: After the new grass emerges, less is more. A good, thorough soaking rather than a quick watering ensures that the water gets down to the root system. This helps roots grow strong and deep for a thick, more drought-resistant lawn.


3. Feed Your Entire Lawn to Nourish It

To encourage the new growth, and keep your whole lawn looking its best, add a gentle lawn fertilizer to the spot, like Scotts Step-3 Lawn Fertilizer, available at GNH!  Tender seedlings, as well as existing grass, need nutrients to help grow thick and strong.


4. Kick Back & Enjoy the Results!

Repairing bare spots in your lawn is a quick and easy project that reaps many rewards. It’s the perfect weekend task that you can finish in no time, so you can get back out in the hammock and enjoy the results! Don’t forget to improve the lushness and color of your whole lawn (and reduce the chance of future damage) with regular feeding and proper maintenance.

Lawn After Lawn Repair

For more on bare spot lawn repair, check out this helpful video from Scott’s Lawn: https://youtu.be/rI4WhxUq4zM

https://www.todayshomeowner.com/how-to-identify-the-cause-of-brown-spots-in-your-lawn/, http://www.planitdiy.com/how-to/lawn-garden/lawn-repair-fix-a-bare-spot/, https://www.scotts.com/en-us/library/grass-grass-seed/how-repair-seed-bare-spots-lawn, http://www.hgtv.com/design/outdoor-design/landscaping-and-hardscaping/how-to-repair-bald-spots-in-your-lawn