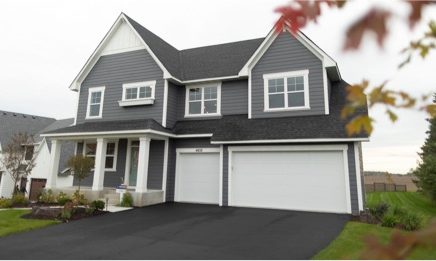
How To Install Engineered Wood Exterior Siding

Installing new exterior siding is a surefire way to improve both your home’s aesthetics and curb appeal! Plus, when you use trusted brands like LP® SmartSide®, installation is a snap! Join our host, Jeff Wilson, as he describes the benefits of engineered wood exterior siding and demonstrates a few installation tips. Starting with the Trim Because…

Spring is here! That means it’s time to start your gardening projects in time to have delicious, fresh veggies and herbs, or a bountiful flower garden all summer long! Not enough space in your backyard for a big vegetable or flower garden? Raised garden beds are the perfect solution for gardeners with limited space! In this blog, we’ll run through a step-by-step guide on how to create a raised garden bed for vegetables or flowers. 1. Choose Your Materials Select your bed frame materials. This can be as simple as regular 2x4’s or even patio retaining wall blocks. The size is up to you! The height of the bed should be at least 6 inches high, which gives the plants’ roots plenty of room to grow. Check out some great YouTube videos on how to build wood raised garden beds.   2. Mark the Perimeter Once you’re done putting together your raised garden bed, it’s time to select a sunny spot ideal for growing and relocate the frame. Remember, if you’re growing vegetables, you need to find an extra sunny spot with plenty of late date sunlight. Using an edger or spade, mark the ground around the perimeter of the frame.   3. Prepare the Soil Now that you’ve created the frame and marked the perimeter, set it aside so you can start preparing the soil. Use a sod cutter or grub hoe to skim away the grass layer, if one exists.   4. Anchor the Raised Garden Bed Once you’ve leveled it out, dig a 5- to 6-inch deep hole for each of the corner posts. Then sink each post into the ground, using a 4-foot level to level it out.   5. Add a Layer of Hardware Cloth to Keep Out Pests Gophers and moles can sometimes be an issue with garden beds. To keep them out of your garden, add a layer of hardware cloth before you pour in your planting soil. Rake an existing soil at the bottom of the bed to level it out. Then smooth it out. Line the bed bottom with hardware cloth, making sure the cloth is flat against the bottom of the bed and touching each side. Secure the cloth by stapling it to the sides of the bed.   6. Add Your Soil Fill the bed with a 50/50 mixture of planting soil and compost. Once the bed is full, rake the soil smooth and moisten it with a slight spray from the hose.   7. Plant! Now it’s time to plant your vegetable, flowers and herbs! Plant anything you like that works in your area.   7. Water Regularly Don’t forget to water your plants often! After all, you’ve spent a long time putting together your garden bed, so you want to make sure you are taking good care of your vegetables and flowers.   Now get started on your spring garden bed project and start enjoying fresh fruits and vegetables and gorgeous flowers and plants!     Click Here to find everything you need to create your beautiful garden with help from GNH Lumber. And contact us if you have any questions about your garden or landscaping project!

DIY: Painting or Staining Outdoor Wood Furniture

With smart planning, painting and staining your outdoor furniture can take place in less than a weekend. There are many different types of outdoor furniture types—wicker, wrought iron, aluminum and plastic—but wood is by far the most popular. Whether you go with an opacity that allows your wood furniture’s natural grain to show through or…