Cozy Outdoor Dining Spaces - Rustic Table

Get Inspired by These Cozy Outdoor Dining Spaces!

The deck design you choose will define the way you enjoy your outdoor space for years to come.

With the weather warming up and the days growing longer, your friends and family will likely want to stay outside from breakfast through dinnertime!

So, don’t forget to include a cozy outdoor dining area in your deck planning process.

Looking for deck dining layout inspiration?

Here are some of our favorite dining area layouts from TimberTech AZEK to help spark you imagination:

Get your deck or porch project started!

1) Invisible Walls

Cozy Outdoor Dining Spaces - Invisible Walls

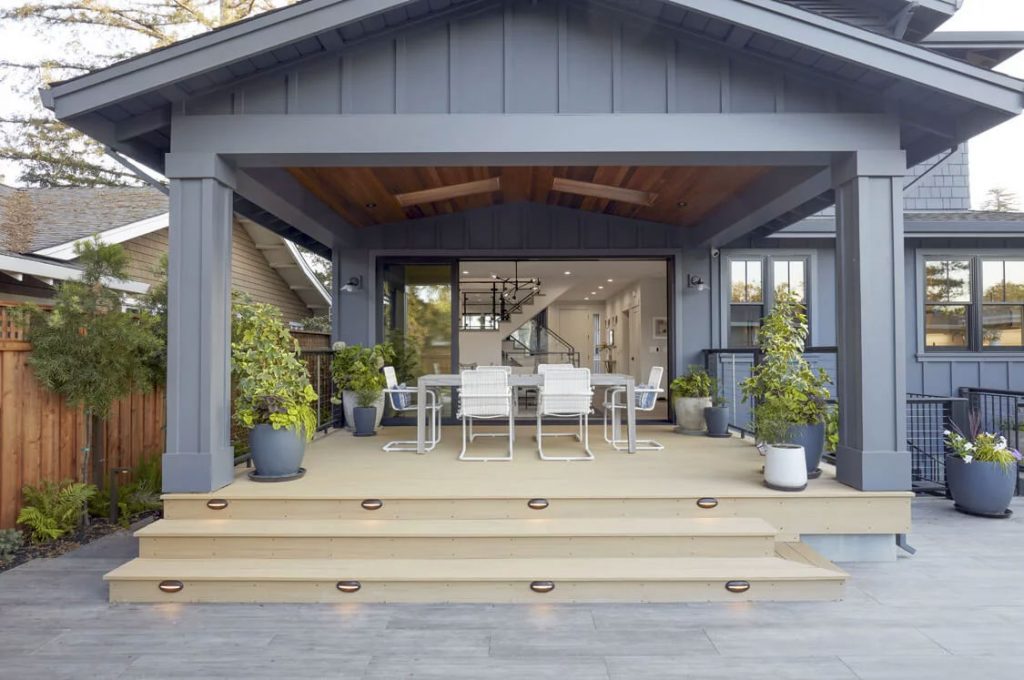
This modern layout treats the back deck like an additional dining room – except with invisible walls. The full, pitched roof and stocky columns reinforce the illusion that this is, indeed, another space inside your home. Skylights in the ceiling and tall potted plants highlight the sense of being inside/outside during your family-style meals.

2) Half-Walls

Cozy Outdoor Dining Spaces - Half Walls

Another way of creating the sense of an “inside room outside” is with half-walls that designate your deck’s dining area. This adds a cozy feel for late morning brunches or early evening cocktails. Utilize large planters against one of the walls of the dining space to create a truly garden-like atmosphere. And add soft accent lighting to the tops of the walls for a romantic glow after dark.

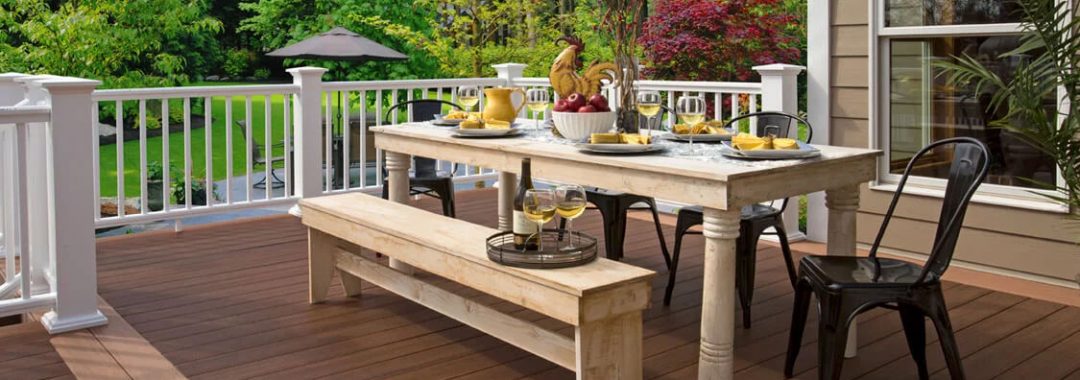
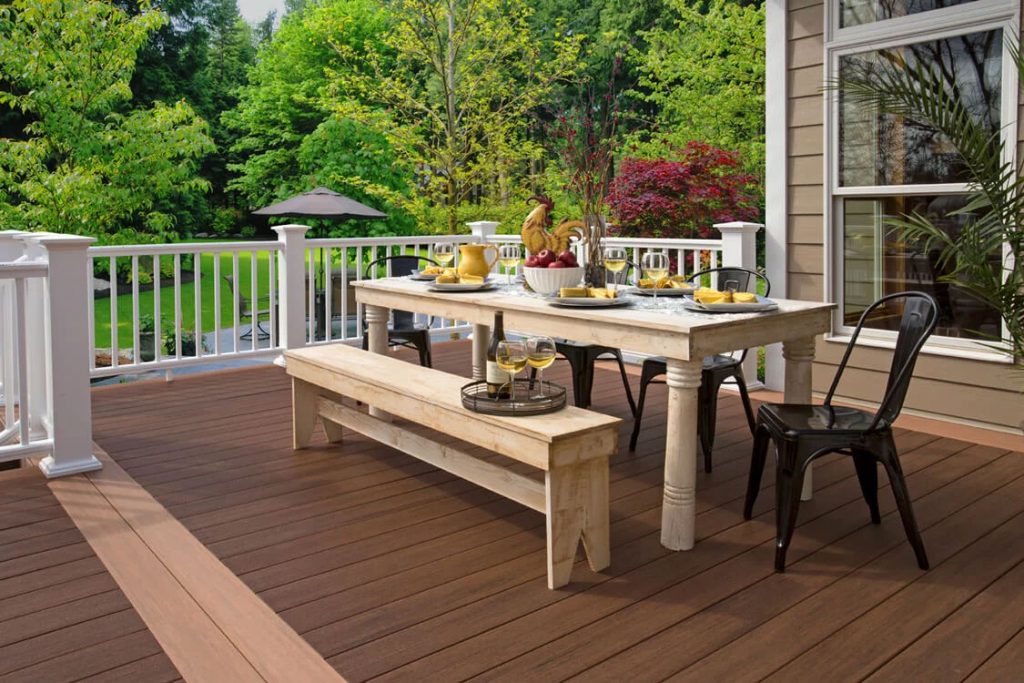
3) Rustic Table & Benches

Cozy Outdoor Dining Spaces - Rustic Table

When it comes to creating a country-style breakfast party on your deck or back porch, set out a rustic woodgrain dining table in a corner of your space and – voila! Instant country-breakfast charm! Using a combination of chairs and rustic benches for seating adds whimsy and contrast. Don’t forget to include farm-themed table settings for that down-home, country feel.

4) Grilling Station with Barstools

Cozy Outdoor Dining Spaces - Grilling Station

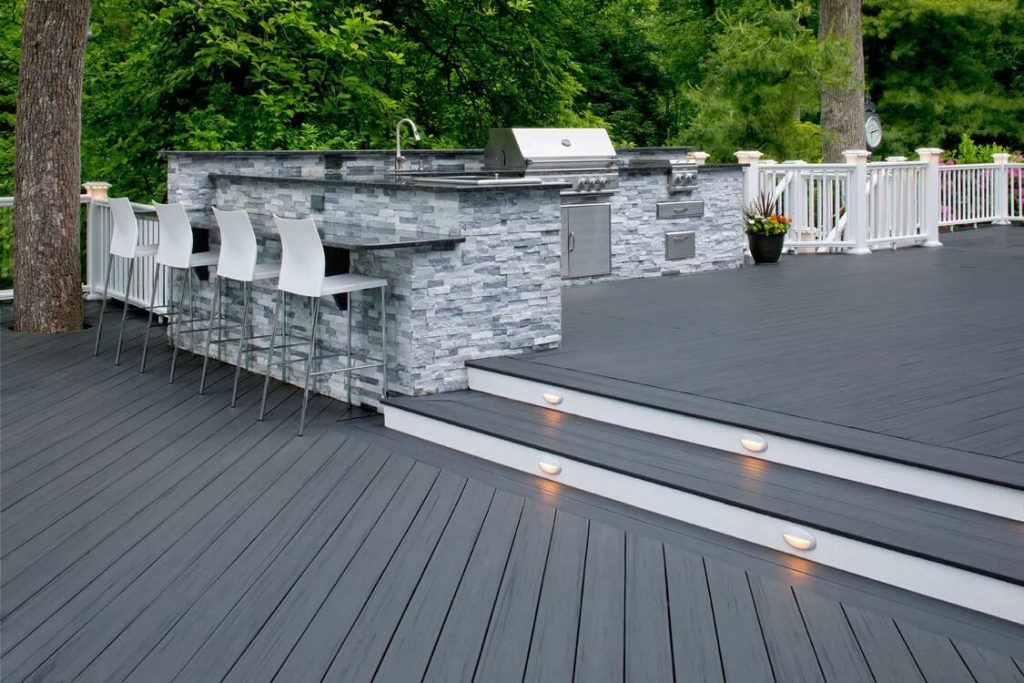
If grilling and chilling with friends is more your speed, consider a custom grilling station compete with built-in burners, warming drawers, ice-coolers, and sinks for added convenience. Entertaining? The sit-down bar is the perfect place to survey the grilling action and sip a brew while taking in the savory scents of summertime.
Still not sure about your deck design? Get a glimpse of your finished project by using the TimberTech AZEK Deck Designer tool! Build and customize your dream deck right from the comfort of your home using a desktop, laptop, or tablet.

And don’t forget! The helpful staff at GNH Lumber is ready to help you create the perfect cozy outdoor dining space to match your dreams and stay within your budget! Visit us in Greenville or Windham to discuss your decking project.

Is it time for a brand-new deck? Get your deck project started today by requesting a project quote or scheduling an appointment to discuss your project. Get your deck or porch project started!

Sources: https://www.timbertech.com/imagine/gallery; https://deckdesigner.timbertech.com/

Spring is here! That means it’s time to start your gardening projects in time to have delicious, fresh veggies and herbs, or a bountiful flower garden all summer long! Not enough space in your backyard for a big vegetable or flower garden? Raised garden beds are the perfect solution for gardeners with limited space! In this blog, we’ll run through a step-by-step guide on how to create a raised garden bed for vegetables or flowers. 1. Choose Your Materials Select your bed frame materials. This can be as simple as regular 2x4’s or even patio retaining wall blocks. The size is up to you! The height of the bed should be at least 6 inches high, which gives the plants’ roots plenty of room to grow. Check out some great YouTube videos on how to build wood raised garden beds.   2. Mark the Perimeter Once you’re done putting together your raised garden bed, it’s time to select a sunny spot ideal for growing and relocate the frame. Remember, if you’re growing vegetables, you need to find an extra sunny spot with plenty of late date sunlight. Using an edger or spade, mark the ground around the perimeter of the frame.   3. Prepare the Soil Now that you’ve created the frame and marked the perimeter, set it aside so you can start preparing the soil. Use a sod cutter or grub hoe to skim away the grass layer, if one exists.   4. Anchor the Raised Garden Bed Once you’ve leveled it out, dig a 5- to 6-inch deep hole for each of the corner posts. Then sink each post into the ground, using a 4-foot level to level it out.   5. Add a Layer of Hardware Cloth to Keep Out Pests Gophers and moles can sometimes be an issue with garden beds. To keep them out of your garden, add a layer of hardware cloth before you pour in your planting soil. Rake an existing soil at the bottom of the bed to level it out. Then smooth it out. Line the bed bottom with hardware cloth, making sure the cloth is flat against the bottom of the bed and touching each side. Secure the cloth by stapling it to the sides of the bed.   6. Add Your Soil Fill the bed with a 50/50 mixture of planting soil and compost. Once the bed is full, rake the soil smooth and moisten it with a slight spray from the hose.   7. Plant! Now it’s time to plant your vegetable, flowers and herbs! Plant anything you like that works in your area.   7. Water Regularly Don’t forget to water your plants often! After all, you’ve spent a long time putting together your garden bed, so you want to make sure you are taking good care of your vegetables and flowers.   Now get started on your spring garden bed project and start enjoying fresh fruits and vegetables and gorgeous flowers and plants!     Click Here to find everything you need to create your beautiful garden with help from GNH Lumber. And contact us if you have any questions about your garden or landscaping project!

DIY: Painting or Staining Outdoor Wood Furniture

DIY Painting Outdoor Furniture

With smart planning, painting and staining your outdoor furniture can take place in less than a weekend.

There are many different types of outdoor furniture types—wicker, wrought iron, aluminum and plastic—but wood is by far the most popular. Whether you go with an opacity that allows your wood furniture’s natural grain to show through or opt for an opaque solid in your choice of 3,500+ colors, a fresh stain on outdoor furniture will yield a great new look.

Staining and painting outdoor furniture is a lot easier with expert advice from Benjamin Moore to guide you. Follow these steps to achieve the best results. And, when in doubt, don’t forget to ask the paint and stain experts at GNH Lumber for guidance and tips!

Get your painting project started!

Step #1: Prepare the Surface

The first step in staining or painting outdoor furniture is to make certain that the wood is absolutely dry and free of mold and mildew. Be sure to check the undersides, too.

If the old surface has stains from mold or mildew, you can properly prepare the surface by using a premium cleaner like Benjamin Moore® Clean (318). For mild cases, you can mix up your own solution using one part of household bleach to three parts water (it’s best to do this outdoors or in a well-ventilated area.) Be sure to rinse the furniture and allow it to completely dry before applying the stain.

If the weather is cold, move the furniture indoors to dry; in milder weather, it’s enough to place the furniture in a garage, carport, or other shelter from the rain. Don’t cover the furniture with plastic or a tarp, as that will not allow enough air circulation for thorough drying.


Step #2: Sand

The next step is to sand the surfaces to be stained. If the old finish is in fairly good condition, it’s enough to just roughen the surface. Start with coarse-grade sandpaper, working with the grain. An orbital hand sander is the perfect tool for this job, if you have one. If the old finish is in bad condition, you may choose to remove all the old finish down to the bare wood. This can be accomplished with a quality wood stain remover such as Benjamin Moore® REMOVE (315).


Step #3: Prime

If the old painted or stained surface is still intact after sanding, you can skip priming. However, if you’re going to apply a lighter color over a dark one, if the wood is exposed, if there are knotty sections, or if any stains remain, you should use a high-quality primer formulated for outdoor use, such as Benjamin Moore’s Fresh Start® High-Hiding All Purpose Primer (046) or Arborcoat Oil Primer (366).

For all priming, brush on the primer working with the grain using a high-quality Benjamin Moore Nylon/Polyester brush.


Step #4: Stain

If you are staining outdoor wood furniture, consider a product that’s strong enough to protect decks: ARBORCOAT® Exterior Stain. Formulated to protect against the harshest weather conditions as well as UV rays, ARBORCOAT offers a range of colors and opacities, including:

If you’ve primed the surface, one coat of stain will be enough. If you skipped the primer, you may want to apply a second coat. Let the furniture dry in a clean, dust-free, well-ventilated area. Don’t leave it outside to dry, as wind and air may deposit dust and particles onto the wet surface.

Once the furniture is dry, you’re good to go. Situate your furniture where it won’t be under a drip line from a roof or tree limb. An occasional light wash with dish detergent and warm water will help you enjoy your outdoor furniture for years to come!


Source: https://www.benjaminmoore.com/en-us/interior-exterior-paints-stains/how-to-advice/exteriors/painting-outdoor-wood-furniture