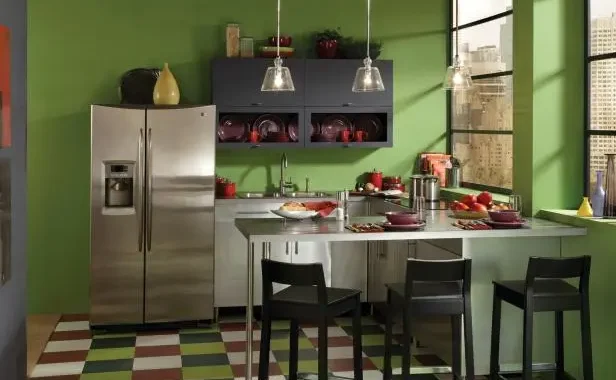
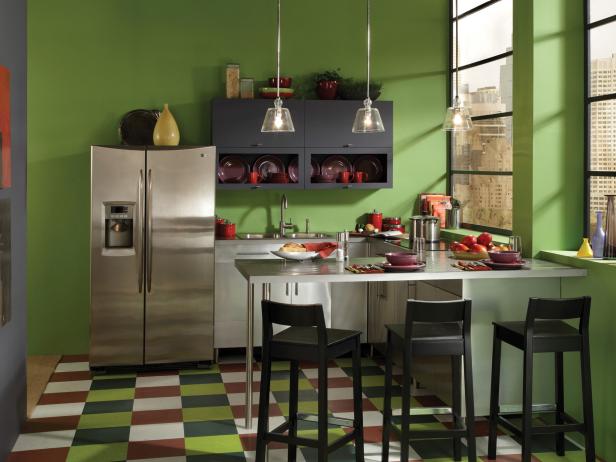
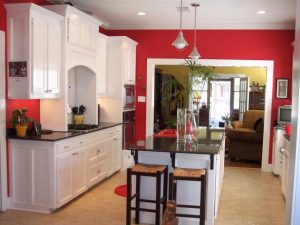
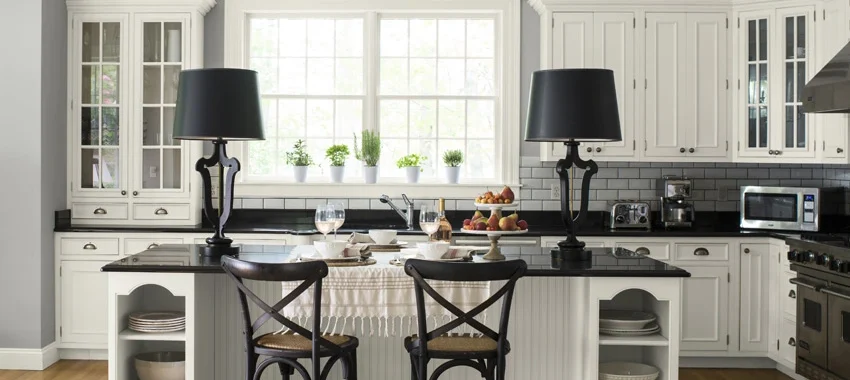
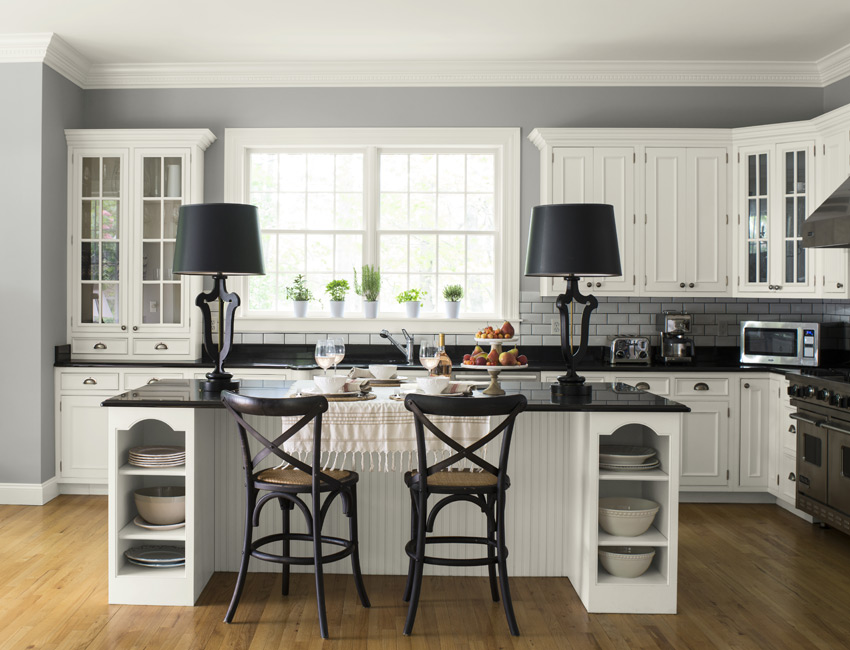
For a quick and easy way to update the look of your kitchen, there’s no better solution than a coat of fresh paint on the walls.
Depending on your choice of color, new paint colors can make the small space feel larger, make a dramatic statement or create warmth and coziness.
When it comes to kitchens, white, gray, blue, red, yellow, and green are at the top of our list for excellent paint color choices. Yellow is homey and cheerful while red is vibrant and intense—both are believed to stimulate the appetite. Yellow, however, will make a tiny kitchen feel larger, while red will make a large space feel more intimate. Blue, white, green and gray are all calming colors that can help you create a bright and inviting space.
Gray is a neutral that’s been taking center stage lately in many homes. It often gets categorized as being too cold, but with the right shade, it can work wonders in a kitchen. Best of all, it pairs beautifully with a wide array of other colors and is the perfect base to build upon in a kitchen. It also works well as a countertop or cabinet color.
Cabinets
Before you select a color, think about how it will work with your cabinets. White cabinets will look great with almost any color, but wood tones will harmonize differently with each paint color. An easy way to see if your colors will complement each other is to paint one section of wall beside a cabinet before committing to the whole room.
If you plan on getting new cabinets, pick your cabinet color first and then the kitchen paint colors second, since the cabinets will dictate the design of the room. Neutral walls work better with very colorful cabinets. So, if you want to go crazy with your kitchen paint colors, try opting for white cabinets instead.
Countertops
Countertops are also important to consider when selecting paint colors. If you have a neutral-colored countertop or plan to install one, you’ll have more flexibility with the paint colors you can use. But if you plan to use a countertop that has a lot of colorful detail in it, you might want to keep your walls more neutral so the two don’t clash.
Appliances
Even the appliances you have in your kitchen can play a role in picking a paint color. By considering your cabinets, countertops and appliances when creating a color scheme, you’re more likely to select a color that will work for the entire room.
Resale Value
The resale value of your home is another important consideration when selecting paint colors for your kitchen. While you might be drawn to a very bold shade, future buyers might not find it so appealing. If you plan on selling your home someday, it’s smarter to opt for a toned-down color scheme.
If you have questions about your kitchen painting project, stop in to your local GNH Lumber for tips, guidance and expert advice!
If you’re a true DIYer and looking for a fun project to tackle indoors, your kitchen is a great place to start! One of the best things about the kitchen is that you can give it an entirely new look simply by adding fresh paint. We recommend focusing on one of the focal points of your kitchen – the cabinets. Think about it, you and your family see and use them every day, so shouldn’t they help your kitchen’s look come together? A great way to accomplish this is to add two-toned painted cabinetry to your kitchen – whether by painting it yourself or choosing from Wellborn Forest Cabinetry’s extensive line of finishes.
What Are the Benefits of Two-Tone Painted Kitchen Cabinets?
Two-tone painted cabinets can fit any design style out there, which makes it a snap for you to craft the kitchen of your dreams in just a few steps. Plus, the color mixing options are endless, so you have even more design options available. Having two-toned cabinets can also improve your kitchen’s aesthetic, increase your home value, and can create an illusion of more space in a smaller home. So, no matter if you’re staying or selling, two-toned kitchen cabinets are the perfect choice for improving your home!
Choose Your Colors
Painting your kitchen cabinets isn’t the same as painting the walls of your home, so you’ll want to use the right paint for the job. Most household paints are prone to chipping and cracking on surfaces like cabinetry. Instead, look for enamel paints, which will look better over time and can withstand wear and tear. Trusted brands like Benjamin Moore have entire lines of special alkyd enamel paints, like their ADVANCE Paints. These even feature a special self-leveling formula, so when you apply your paint, it will leave a smoother finish!
Additionally, WF Cabinetry can match paint colors from Benjamin Moore. You can even have a sample door made so you can see how your preferred color will look in your kitchen.
Why Are Complementary Colors the Best Choice?
The colors you pick are just as important as the type of paint you use. Whatever color you decide on, make sure it complements your kitchen and appliances. If you have a lot of black appliances in your kitchen, try a rich dark brown to create a flowing, uniform look. Whereas, if you have an abundance of almond appliances, painting the cabinets a similar light sand color will work perfectly. Stainless steel appliances are even more versatile in terms of complementary color options, and the only limit is your imagination!
Stock Up on Supplies
Your painting project will go much smoother if you have a few other essential supplies and tools. Disposable paint trays are a great investment, as you can place your “real” tray in one for a firm roll, then simply throw out the plastic tray when you’re done! Purchasing extra brushes and rollers can help make your clean up easier as well, especially if you use any oil-based paints that can gum up the bristles. Perhaps the most important tool of all is the canvas drop cloth. We advise using at least two that you can move around the room as needed just in case any drops make their way to the floor.
Prep Your Kitchen
With all your paint and tools assembled, now’s a good time to get any moveable hardware or appliances out of the way. Then, remove any hardware from your kitchen cabinets, including knobs, hinges, and screws. It’s helpful to keep all this cabinet hardware organized while you’re painting. Try labeling each door by number underneath the spot that the hinge goes in the frame. Then, label a plastic baggie filled with that specific door’s hardware with the same number. You can place a piece of painter’s tape over the number on the door, so when the painting is finished, you can remove the tape and see the number.
Paint Away
Now we get to the best part – painting those cabinets! When painting, we recommend starting with the cabinet bases and the backsides of the doors first. This gives them more time to dry and really set, as they’ll be seeing the most action from the opening and closing of the doors. As with many other paint projects, it’s best to use light coats of paint to avoid drips. Don’t forget to add a topcoat of polyurethane either. This can help add an extra layer of protection and seal the finished look in beautifully.
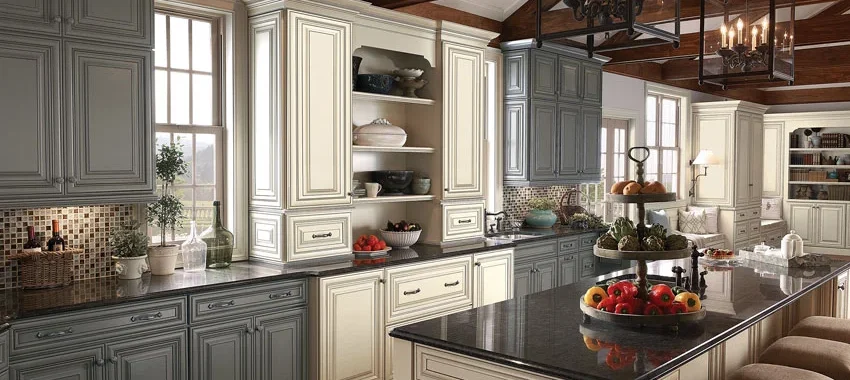
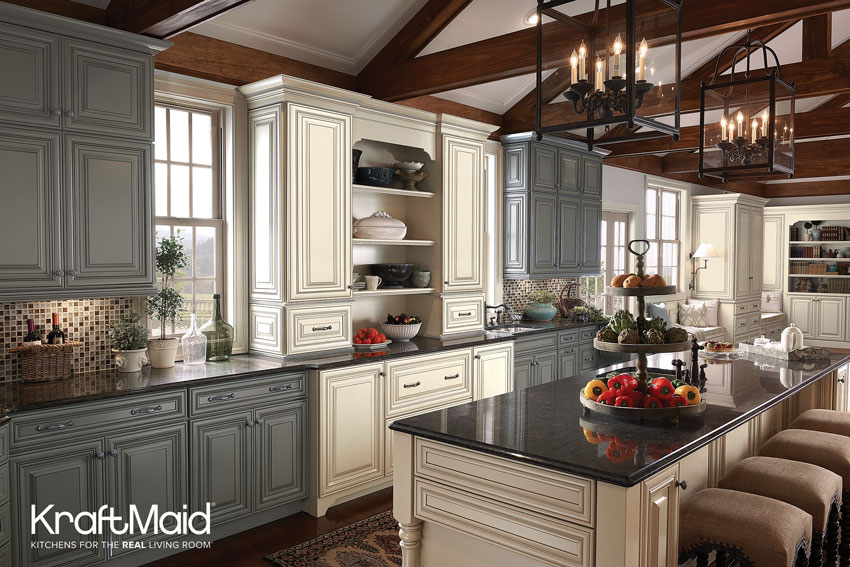
Is your kitchen space large or open concept? The layout of your kitchen design will help establish work zones, influence counter space, and allow for seating – or maybe not. Your GNH designer will help you choose a layout that maximizes your larger kitchen space and supports your family’s goals.
Here are three popular kitchen layouts for larger kitchens from KraftMaid:
1. G-Shaped Kitchens
This layout uses nearly every square foot of available floor space by adding a peninsula or partial fourth wall of base cabinets to a U-shaped layout. Because the narrower entrance into the work zone can make a cook feel claustrophobic, this layout works best in larger kitchens.
Adding a short return on the open side of a U-shaped layout minimizes traffic flow in and out of the work zone.
There are plenty of places to set up specialized zones.
This layout features the most corner base cabinets. Use corner storage solutions in your design plan to maximize utility in these awkward spaces.
2. L-Shaped Kitchens
Placing cabinets along two perpendicular walls form an L-shaped layout and adapts well to a variety of spaces, making them one of the most popular kitchen layout options.
This layout is the most cost-effective and efficient way to create a work triangle.
Typically, one side will feature your sink, while the stove goes on the other. Your refrigerator can go on either side, the longer one if available.
L-shaped layouts are great for kitchens that open to a dining or living room. With no barrier between the kitchen’s work space and adjacent room, both areas feel larger.
3. U-Shaped Kitchens
A U-shaped kitchen has cabinets along three walls with open access on the remaining side. If your room is large enough, set up multiple work zones on different sides of the “U” so two people can use the kitchen without getting into each other’s way.
Continuous countertops and ample storage surround the cook.
A U-shaped kitchen has potential for more upper cabinets than other layouts.
When three perimeter walls aren’t available, add a peninsula to an L-shaped kitchen to form the third side of the “U.”
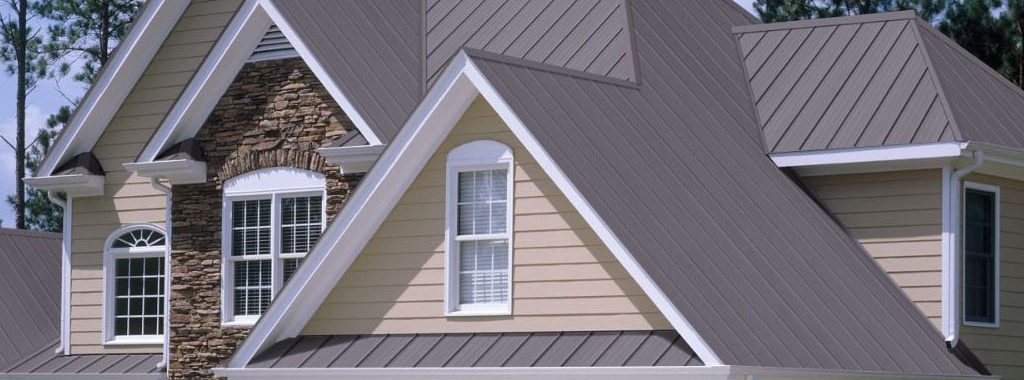
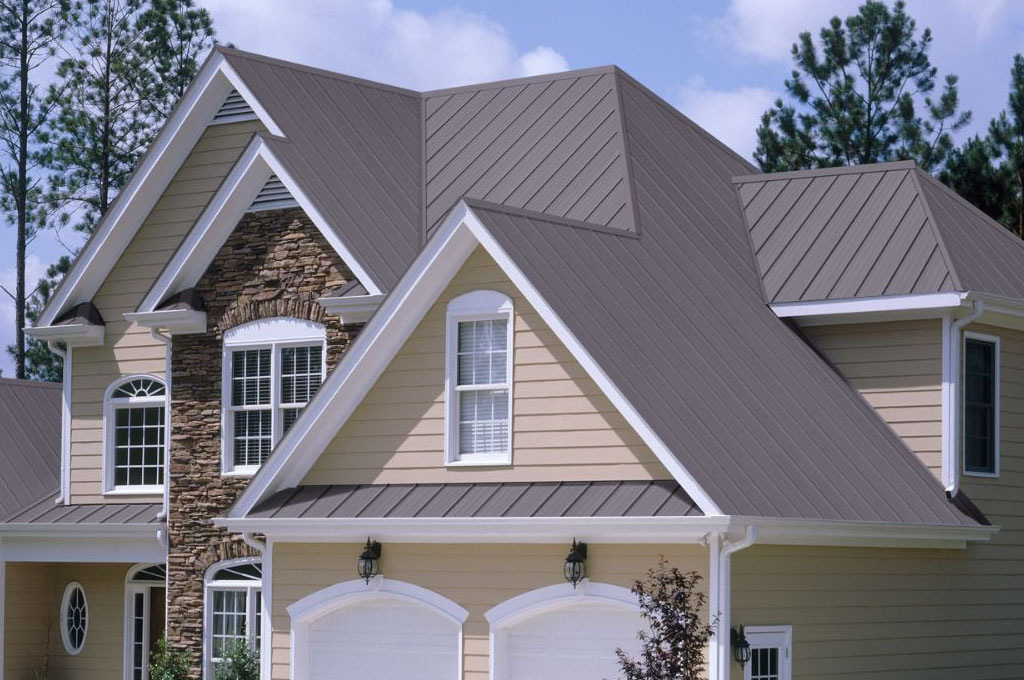
When most people think of metal roofing, they usually picture large commercial buildings. But metal roofing has been surging in popularity with residential homeowners lately. It’s a viable alternative to traditional asphalt roofing, but what are the benefits of metal roofing? Well, whether you’re building a new home from scratch or updating your existing roof, there are a few distinct advantages that you can enjoy!
Better Cost-Effectiveness
One of the key benefits of metal roofing is that a metal roof will last about 40 to 70 years, whereas traditional asphalt roofs last about 12 to 20 years. Live in your house long enough and you could end up replacing an asphalt roof anywhere from two to five times in the length of time a metal roof would remain in good condition. As a matter of fact, for many homeowners, the first metal roof they install on their home is the last roof they install!
Better Energy Efficiency
If you’re looking to save some money on your home’s monthly bills, installing a metal roof might be helpful. Homes that have metal roofs can help reduce your annual energy spending due to a couple of factors:
Reflectivity: Reflectivity means how well the roof reflects the sun’s rays, which metal roofs are great at. When your roof reflects the sun, it decreases the amount of heat transferred into the attic. The less heat in the attic, the lower your electricity bill will be!
Emissivity: Emissivity means how quickly your roof cools off after the heat is removed. Your roof is exposed to extreme heat in summer, and no matter what, it will soak the radiant heat and transfer it to the attic, essentially trapping it and making your AC unit fight to get it out. With energy-efficient metal roofs, your roof will be cool to the touch after the sun goes down, allowing your AC unit to take a much-needed breather, and resulting in lower cooling costs.
Better Weather Resistance
In our neck of the woods, heavy snowfall and rain are a common concern. Thankfully, adding metal roofing to your home makes dealing with inclement weather a snap! Metal roofing is hard and slippery by nature which makes it hard for snow and water to make a grip. On top of that, if you install dark tones of metal roofing or metal roofing with a PVDF coating it doubles up the benefits of metal roofing. Dark tones of metal roofing quickly warm to the sun, encouraging snowmelt and the resin polyvinylidene fluoride (PVDF) coating that’s common on both Union Corrugating or McElroy Metal Roofing helps to reflect back more sunlight, further increasing your roof’s resistance to snow or rain buildup.
Better Curb Appeal
Every homeowner is going to have an opinion about what looks best on their home. But even for those who only prefer the look of shingles on a home, there are specialty metal roofing options available that look just like them! In fact, there’s a ton of metal roofing options available in a wide variety of both styles, colors, and finishes. Shingles, on the other hand, typically only come in a limited number of colors. With a metal roof, you get the benefit of using the most energy efficient materials that save you money for several decades – on top of making your home look even more fabulous.
Add Innovation & Durability with Metal Roofing
Metal roofing has truly come full circle over the years! More and more homeowners are discovering the benefits of metal roofing and are adding it to their homes with great results. Get in touch with the GNH Lumber team today to learn how it can improve your home!
Did you know that with regular maintenance, a deck will easily last for twice as long as one that isn’t maintained? It’s true, and what’s more, most decks can be rejuvenated for a lot less than the cost of replacement.
Begin by inspecting the entire deck. Pay special attention to any part of the deck that is in direct contact with the ground, such as the posts, stair stringers, or joists that are at ground level. We recommend using a screwdriver to check for structural damage.
Tip: If you can sink the tip of a screwdriver into a post or joist, it means you’ve got rot and it’s time to consider renovation.
Also, inspect the connection of your deck to your house. Screws and bolts can loosen and rust, and without the proper use of spacers and flashing, moisture can cause your band joist to rot.
Be sure to tighten the fasteners that attach the deck to the house, while looking for any missing, bent, or rusted flashing. Then, carefully inspect inside and out for any telltale black stains that suggest moisture is working its way into your home.
Next, look for any cosmetic damage. For example, tap down any popped nails or consider replacing them with screws. We advise using galvanized ring-shanked nails to repair damaged boards and ensure longevity.
Tip: If you need to rip replacement decking to match existing boards, use a table saw. Ease the sawn edge using a router fitted with a ⅜-inch roundover bit.
Finish by carefully inspecting your railings and decking for loose wood. This avoids the possibility of splinters or further cosmetic damage to your deck.
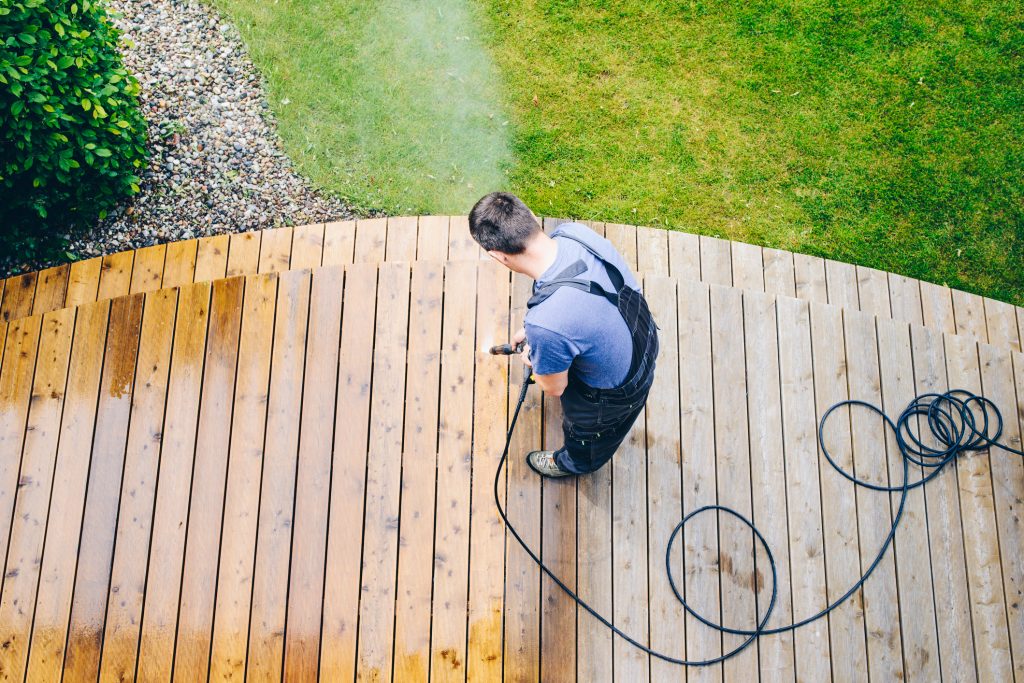
2) Clean the Surface
Assuming your deck has been maintained regularly, it can be revived with a simple deck cleaner. Some products are mixed in a bucket and applied to the deck directly. Others come in containers with applicators that you hook up to a garden hose. Once on the deck, most still require a stiff-bristle brush and a lot of elbow grease to work the mixture into the wood.
Here’s a deck cleaner you can make yourself and that’s great for mildew and dirt:
In a 5-gal. plastic bucket, add the bleach and detergent to the water, then brush the cleaner onto the deck. Rinse thoroughly before applying a finish.
For tackling tougher stains, use a pressure washer. which is the best way to remove sun-damaged wood fibers and tackle scrub-resistant stains. Graf recommends using a fan-type nozzle instead of a pinpoint nozzle that can dig into the wood.
Finish by going over your deck with a stiff-bristle brush to work the cleaner into the wood fibers, and then rinse. The boards should be kept damp in order for the cleaning solution to work effectively. Allow the deck to dry thoroughly before moving on to the next step.
3) Sanding Your Deck
When the deck is dry (36-48 hours after washing, depending upon humidity and weather conditions), it’s time to sand the surface. You can use a pole sander with 80-grit sandpaper to remove all the loose wood fibers that were lifted by the pressure washing. Or, try using a DeWalt 5-inch variable speed random orbit sander with 80-grit sandpaper to really smooth out the surface.
When you’re finished sanding the entire deck, use a leaf blower or the reverse outlet of a wet vac to remove dust from the surface and between any cracks.
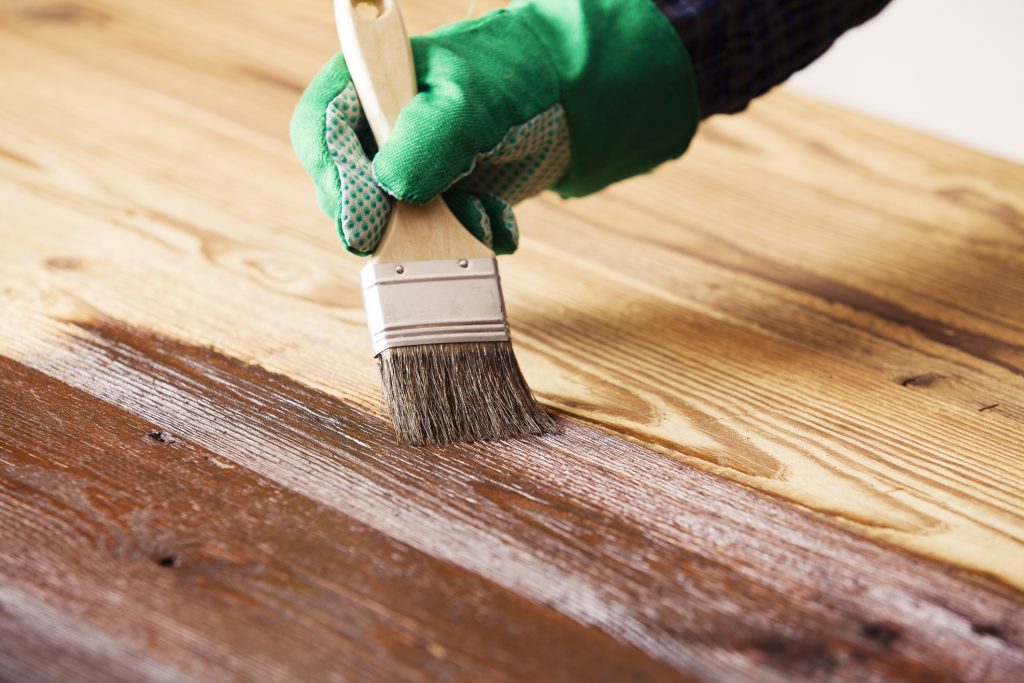
4) Staining and Preserving Your Deck
Once your repairs have been made and the deck is sparkling clean, it’s time to apply a protective finish. Clear finishes and transparent stains are fine for new wood, but for older decks, we recommend using a semitransparent stain.
Start by spraying on a light coat of stain and using a brush to remove puddles or splotches. Start at an inside corner and work out, applying the stain parallel to the deck boards.
Tip: To avoid staining nearby brick, use a small piece of cardboard as a spray shield.
Subsequent coats should be applied while the first coat is still wet or they will not be absorbed into the wood. The stain won’t peel, but it can wear away, especially in high-traffic areas. It’s best to apply a fresh coat every other year. A clear water repellent can also be applied between staining for extra protection.
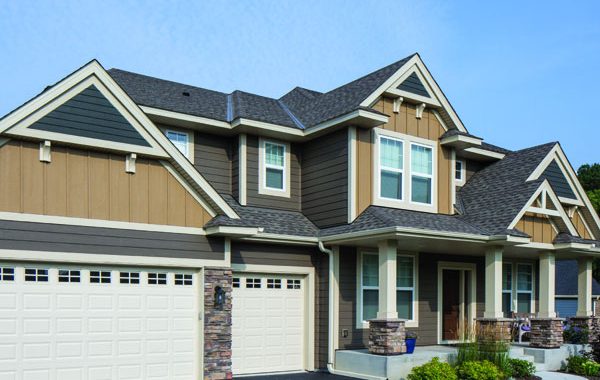
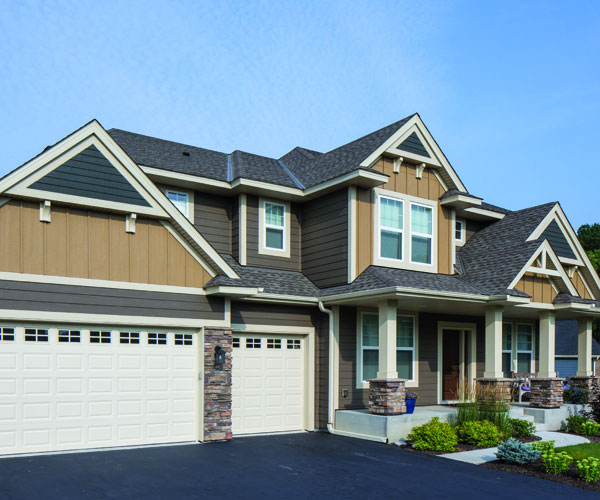
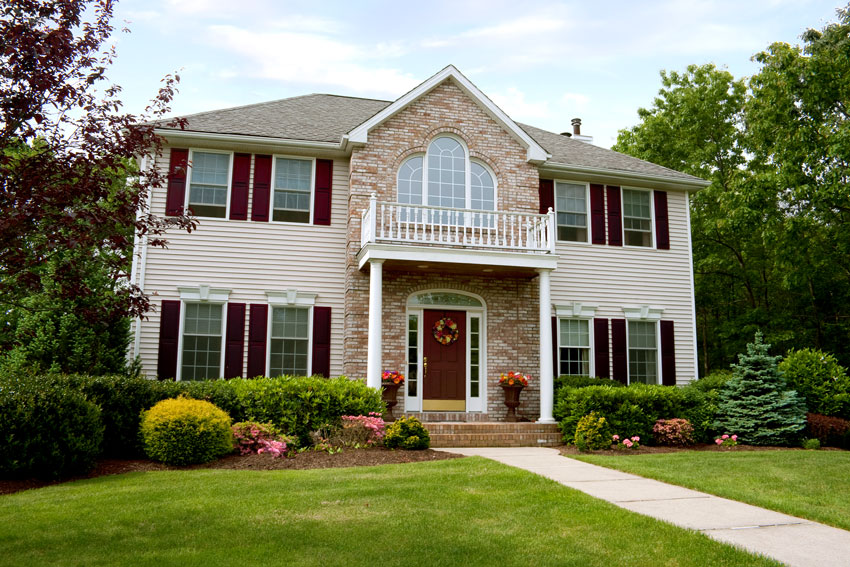
There are many benefits to choosing a neutral color palette for siding and trim. For one, neutral colors appeal to the broadest range of potential home-buyers, making your home more marketable when it comes time to sell.
Neutrals also may be the top pick in your particular neighborhood, and therefore necessary to help your home blend into its location. And because siding is something that will potentially grace your home for decades, neutral siding and trim colors are a timeless choice.
Even if your current siding color palette is quite basic, this doesn’t mean your home can’t have personality and curb appeal.
There are many creative ways to accent neutral siding if you’re looking for just a pop of color. Try these ideas to give your home a fresh new look!
1) Create a Welcoming Entrance
The entry door is a great candidate for color! If you want to paint an existing door, use a high-quality acrylic latex paint for maximum durability. Before painting, don’t forget to clean the door, use a sander or sandpaper to remove any imperfections, and apply a latex-based primer.
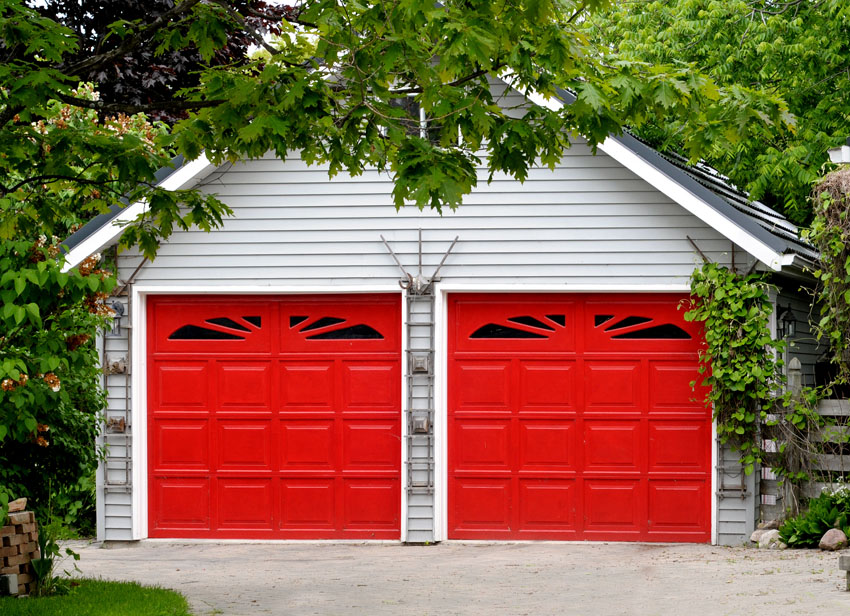
2) Choose a Bright Garage Door
Take it from DesigningIdea.com: “The color red brings intensity to a home’s character. It creates a strong impression and radiates a welcoming feel. Red garage doors are intense visual components which direct the attention away from the house. This is the ideal color if you want to make your garage door stand out from the rest of the features of your home.
“Aside from the popular ravishing red and fire red, there are less intense options like burgundy and maroon which work well as garage door colors for traditional houses. Red garage doors work well for neutral (white or beige) and earth toned exteriors. For more modern and adventurous applications, a red garage door can also be used for adding a punch of color for pale yellow or blue houses.”
3) Add Bold Shutters
Whether functional or decorative, shutters add color and historic charm to a home. For the look of wood with the least amount of maintenance, look for shutters made of fiberglass, PVC or composite wood.
4) Try Creative Gardening
A neutral home can be the perfect backdrop for a riot of colorful shrubs and flowers. From blooming shrubs to lovely annuals and perennials, there are many plant options to make your home inviting. Ask your local nursery or landscaping company for recommendations.
5) Colorful Pavers & Pathways
You use winding, curvy pathways to contrast with and compliment the hard lines of your home exterior – why not also use them to add a pop of color? Try alternating brick red and light tan to create a host of interesting designs, patterns and effects.
6) Rock Some Unique Porch Chairs or a Swing.
Can’t commit to a bold shutter or entry door color? Take your color to something that can be moved, such as chairs, a swing or planters. You’ll get the same colorful effect that can be easily updated or removed when the mood strikes.
Is it time for new siding? Are you interested in learning about LP® SmartSide® engineered wood siding products? We invite you to experience the upside of remodeling with the LP SmartSide Visualizer. Pick your home style, or upload an actual photo of your home. Choose your siding and trim colors. See what you can achieve with different LP SmartSide siding options. Then get your home re-side project started today by requesting a project quote or scheduling an appointment at GNH Lumber to discuss your project particulars!
Keeping your home’s exterior siding in good shape is not only a great way to improve your home’s appearance, it also helps you avoid repairs and costly services down the road. With a bit of preventative maintenance, you’ll be able to extend the life of your home’s exterior siding for 50+ years!
In this blog, we’ll discuss how to clean and maintain your home’s exterior siding so you won’t have to worry about costs adding up for a few decades.
How Do You Maintain Your Home’s Exterior Siding?
No matter the materials, it’s important to clean your home’s siding every six months or more to keep it in optimal condition for many years to come. You should also inspect your home’s exterior for any damages at least every six months, or after violent storms and high winds. Here’s a quick guide on how to maintain the siding of your home based on the material:
Vinyl Siding Maintenance
Vinyl siding is low maintenance and is designed to be left alone, which is great! However, this doesn’t mean that it doesn’t have to be maintained. The good news is that you can easily clean vinyl siding yourself.
Vinyl siding requires a good power washing about twice a year. Check a few times a year to make sure no boards have come loose or are cracked. If they are, they will need to be fixed as soon as possible. High winds can cause damage and cracks to vinyl easily, so if you had a windy season, be sure to do a walk-around your home after the storm. Remember to give it a good pressure-washing twice a year to reduce damage and renew bright colors.
Tip: Making repairs early will save you money on more costly repairs further on down the road!
Wood Siding Maintenance
Wood siding will need to be treated every 4 to 6 years. In New York, sun and snow are particularly abundant so you may have to treat it more often than that. Because wood is porous and vulnerable to the elements, it also requires paint, stain or sealant to prevent it from moisture, rot and decay.
Like vinyl siding, you need to check the wood siding for cracks and breaks. Most repairs are easy to fix, so do it as soon as you notice the damage. If the color of your wood siding has been lost due to fading and old age, or if it’s spotted with mildew or rest, don’t worry! You can recover your wood’s natural beauty by using a stain remover, wood cleaner or brightener.
Stucco Maintenance
Often times, woodpeckers will attack your stucco siding. They tend to leave holes which will need to be replaced immediately or else they will live in your walls. Since stucco is a very porous material, if a tree leaks its sap on your siding, it can take over and cause huge problems. It can stain rather quickly so go around once or twice a year to remove any stains that are starting to form with a degreaser and bleach.
Cedar Shake Maintenance
If you want your cedar shake siding to live for a long time, you want to make sure it’s treated or stained properly and checked often. Left untreated, cedar shakes can discolor and start to soften, causing it to rot. In order to maintain healthy cedar shakes, you want to make sure to paint or stain the cedar every 5 years. Stain is a more effective protectant for cedar than paint so opt for stain when you can. Hiring a professional to paint or stain your cedar shakes could cost upwards of $2,500 depending on your home’s size.
How Often Should You Clean Your Home’s Siding?
The exterior of your home needs a good cleaning about twice a year. Overtime, cobwebs, dirt and mildew can build up and shorten the life of your siding. A clean house will protect your siding as well as your investment.
How Do You Clean All Types of Siding?
Cleaning the siding of your home can be a bit treacherous, but luckily you only need to do it once or twice a year!
All types of siding benefit from a good cleaning to remove residue. Here’s how to do it correctly:
1. Check for Cracks and Damages in the Siding
Do a quick walk around your home and check for cracks, chipped paint, cracked boards, or other damages before you start the process of cleaning your siding. If you have cracks, water from cleaning could seep into the home, causing serious damage and trouble over time.
2. Invest in a Power Washer
A power washer is key to getting up in the peaks of your house by the roof, blasting away grit and grime, and takes far less time that washing the home’s siding by hand. This is especially true for homes with vinyl and wood siding.
3. Scrub the Siding with TSP
Next time you’re at GNH Lumber, pick up some TSP (trisodium phosphate). The TSP that GNH Lumber carries is phosphate-free. Mix ½ cup with 1 gallon of water and apply to a sponge, washcloth or soft-bristled brush. Start scrubbing those stubborn areas where birds or spiders have left their droppings. These are usually the toughest things to get out of your siding! Work from the bottom to top to avoid streaking and then rinse.
Don’t want to mix your own solution? GNH recommends 30 Seconds Cleaner for Algae, Mold and Mildew. This powerful formula is safe to use around landscaping, plants and your lawn. Simply attached to a garden hose, spray on and hose off. It is proudly made in America and has been around since 1977 so it is a tried an true product. Stop into our Greenville or Windham locations and ask for it by name.
Keeping your home clean and maintained properly can save you tons of money in the long run!
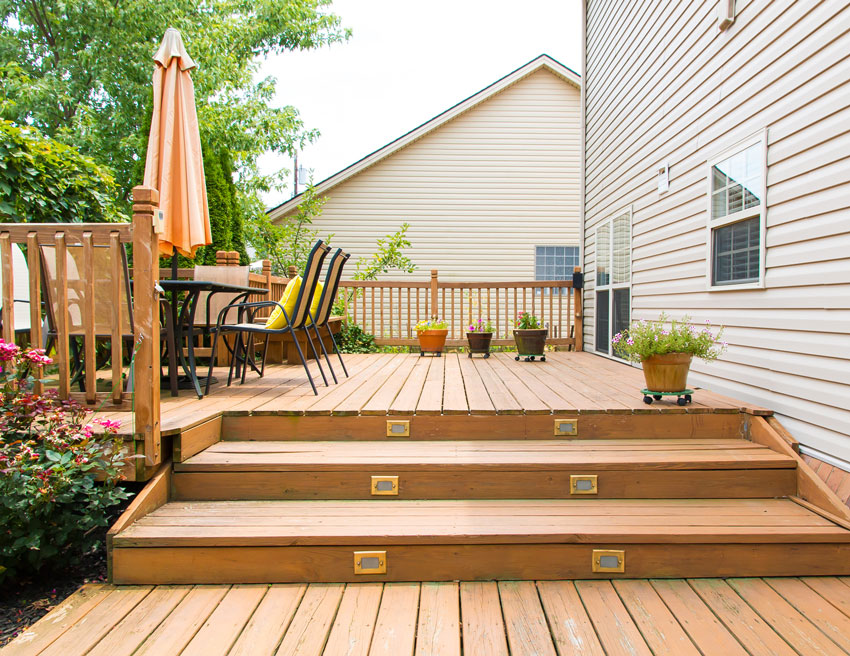
Creating the perfect outdoor space is easier than you think! If you’re looking to spruce up your backyard and beef up your home’s curb appeal, your deck and its surrounding space is the best place to start. But there are a lot of different ways to bring your vision for your outdoor living space to life. That’s why we recommend you stick to a simple formula for remodeling your home’s backyard space. Simple deck design ideas work best – especially when combined with new doors and stone accents!
Fresh Decks Let You Live Your Best Life Outdoors!
When you’re designing (or redesigning) your deck, you should choose products that seamlessly blend simple designs and tech. The ideal decking product is durable, easy to install, and looks sharp no matter the deck’s style. Whether you’re completing the project yourself or hiring out a contractor, the material should work within your design! Products such as Timbertech AZEK decking provide the best variety of colors, wood grains, and widths to bring any design to life.
We recommend you start by deciding on color – after all, your deck’s hue should speak to you! From there, you can decide on specific color combinations, shades, and even special wood grain patterns. By changing your decking’s highlights or lowlights, you can create a wide range of coloring. From there, it’s time to decide on your boards’ width. You don’t have to feel pigeonholed into “standard” sized boards anymore, either! Nowadays, wider boards are very trendy – and narrower boards can give your deck a coastal vibe. Don’t be afraid to mix and match board sizes either, the right combos can give your deck a uniquely modern look!
Once you’ve designed your deck around these simple ideas, don’t forget the railing! The right rail makes the perfect pairing to a deftly-designed deck. Before you add railing, we recommend considering these factors first:
Consider the architectural style and color story of your existing home. Which decking and railing combos would best complement them?
If you’re planning for a deck with an adventurous design, have you found a contractor that has experience with complex builds? If you’re DIYing – do you feel comfortable doing it yourself?
When it comes to railing, are you looking to keep your views unobstructed with something minimal or make a bold style statement?
Which railing profile do you prefer: classic millwork, modern and minimalist, or a sleek drink rail?
After you’ve answered those questions, you’re ready to build that deck!
Perfect Views with Sliding Glass Doors
Adding sliding doors to your deck is great for accenting your backyard and improving your outdoor panoramas! Massive openings are possible with sliding doors. They open up your home and create a stronger connection to nature and the outdoors. Large openings are also perfect for high traffic areas like the passageway leading to a patio during a backyard get together. Even better – furniture and other household items can be placed near a sliding door.
If you’re looking for a sleek, sharp, and simple look – try Marvin’s black sliding door patio series! This modern, yet subdued tone works well with many different shades of exterior siding and decking. Or, if you’re looking for something more upbeat and contemporary, try their urban patio series. These sliding doors offer defined lines and urban style for any home!
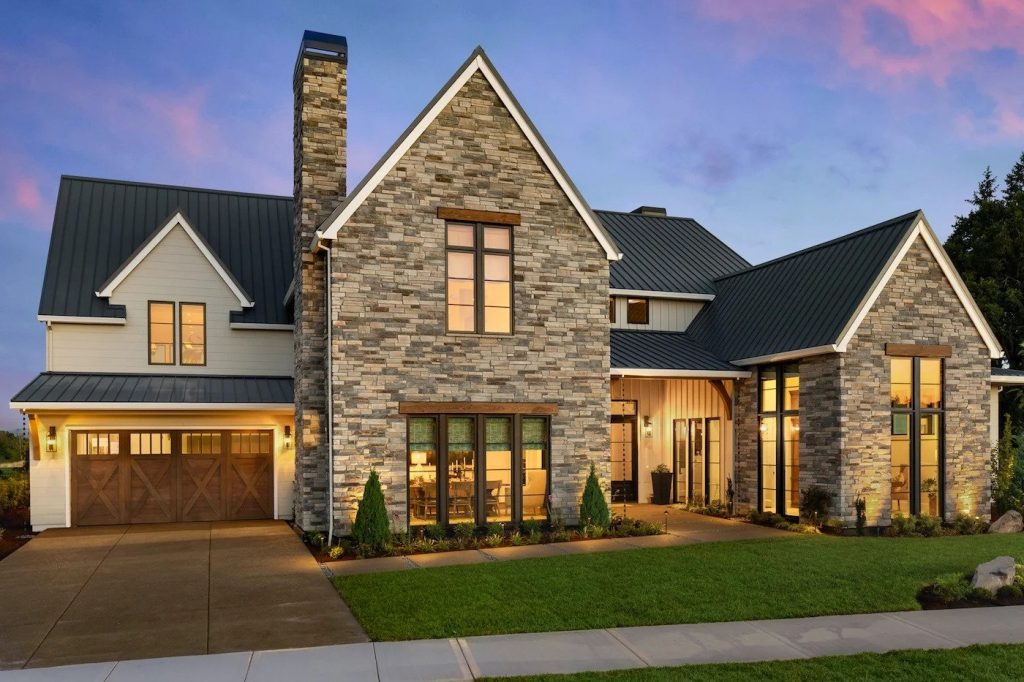
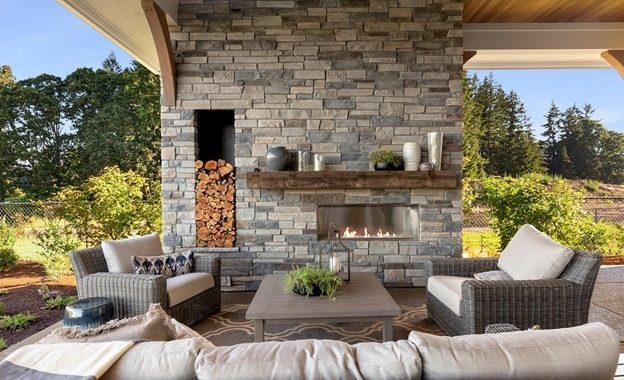
A Completed Cultured Stone Look
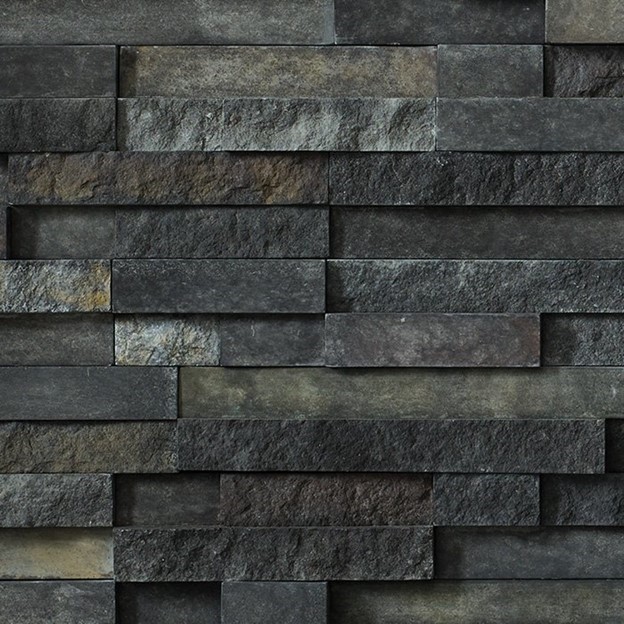
Once your deck and doors are taken care of, there’s one last simple design idea to tie your backyard space together! A stone pathway or even a stone firepit are the best “last touches” for your outdoor getaway. But don’t worry about feeling tied to natural stone, which can be costly and difficult to work with. Manufactured stone veneers, such as Cultured Stone, are the perfect alternative! These products mirror the look and feel of natural stone, with superior performance and versatility.
Once you’ve customized your space, the details add all the warmth and togetherness it needs. And nothing imbues your outdoor space with comfort quite like a fireplace. Signature fireplace surrounds or pit designs can tie your whole backyard together. Tastefully-designed pathways add simple elegance and make wandering your outdoor space a dream!
Though redesigning or remodeling your home’s backyard space can seem daunting – it really isn’t! By taking it one step at a time and having a defined plan with simple, versatile designs, you can get it done. If you need help getting your design started, or need to find the best supplies, contact our helpful team!
With the weather warming up and the days growing longer, it’s the perfect time to spruce up your home exterior! Whether you’re building a backyard retreat (complete with firepit!) or looking to give your home exterior a new look, one product stands out. Cultured Stone veneers are a stylish and versatile option that are great for many projects. What’s more, they’re the right tool for anybody – DIY or contractor, for jobs big and small. The installation process is simple and can be completed in just a few days.
Materials Needed
Before you begin the exterior installation process, make sure you have the following tools and materials on hand:
• Cultured Stone manufactured stone veneers
• Safety equipment (N95 mask, safety glasses, work boots, etc.)
• Flashing
• Rain screen
• Jointing tool
• Masonry brush
• Spacers
• Water resistant barrier (WRB)
• Grout sealer
• Pointing trowel
• Notched trowel
• Welded wire lath complying with ASTM C933
• Corrosion resistant fasteners (staples, roofing nails, etc.)
• Mortar (scratch coat, setting bed, and pointing)
• Drop cloths and cleanup supplies
Job Site Setup
Before beginning your project, start by storing all your materials out of the way, but still convenient to application. Be sure to eliminate any trip hazards and keep your Cultured Stone veneers protected from any worksite dust or inclement weather. Use your drop cloths to protect any landscaping.
Wall Prep
If your home exterior project has metal or wood framing, begin by applying two layers of WRB as independent layers, lapped in “shingle” fashion. Evenly install your flashings across the primary layer. Make sure that your primary WRB meets all building codes and manufacturer requirements, depending on your project.
After installing the primary layer, apply the second “sacrificial” layer of WRB, to allow incidental water to drain down and out. Lap each material 2” horizontally and 6” vertically, fasten with WRB-approved fasteners.
Make sure that any contact with doors or windows are flashed properly. Head flashings and drip screen will help resist water damage.
Adding Your Rain Screen
For any home exterior projects that involve adding Cultured Stone veneers to your walls, adding rain screens adds an extra layer of protection against water damage. This physical airspace behind the cladding provides a larger path for drainage, using a ventilation drying effect. Standard building codes allow for just a single layer of rain screen, but be sure that it is at least 60 minute building paper or equivalent.
Lath Application
Depending on whether you use expanded metal, woven wire, welded wire, or alternative lath, it needs to transfer cladding load to your framing. Make sure your fasteners penetrate the framing and are spaced evenly. Typical applications would have fasteners 16” on center, spaced a maximum of 7” vertically.
When placing lath, always end lap joints over framing and fasten them there. Any that does not land on framing will need to be wire laced. For all overlaps, use at least 0.5” horizontally and 1” vertically and at end laps. NEVER end your laps at a corner, as this creates sharp edges and breaks in the barrier.
Mortar Application
Once the lath is installed, check for roughness. This will tell you the direction of the cups and determine which direction to apply the mortar. Follow the same path as the cups, using consistent pressure with your trowel to ensure mortar completely fills the lath. Whether your mortar is pre-blended or created on-site, make sure it meets NCMA standards.
Aim for at least a 0.5” to 0.75” layer of mortar, as anything less than 0.5” inches is too thin and runs the risk of cracking. Cover all lath at your target thickness, keeping at eye out for thin spots. You may need to apply a second layer to achieve desired thickness and levelness.
After letting the mortar cure for a few hours, it’s time to texture the surface with a scratch coat. Use your notched trowel in even, horizontal strokes across the mortar. This will allow your Cultured Stone to connect easier to the walls or surfaces. Allow at least 24-48 hours for the mortar to cure completely.
In warmer weather, remember to lightly mist your scratch coat and stone units to keep them properly hydrated.
Setting the Stones
Before installing the stones, check the back of each and remove any dust or debris. Then, gently dampen the scratch coat and stone units with clean water. Make sure both look saturated, but not shiny with water.
Apply your setting bed mortar onto a few square feet of the prepared surface with your trowel. Then apply a thin “back butter” of mortar to the entire back of the stone unit. Press the stone into the setting bed mortar on the wall. Leave enough space for joint gaps, and then leave the stone be.
Clean out mortar droppings as you go along and check stone bonding periodically. If a stone needs to be re-mortared, remove all original mortar first before re-applying and re-setting.
Be aware that if you’re setting stones in corner layouts, that flat stones can be nested and alternated to create a uniform look.
Large Format Stones
For large firepits or radical home exterior redesigns, large format stones are a viable option. The key to proper bonding is achieving a full setting bed of quality mortar, with ample spacing between units. You should also take time to ensure your scratch coat is level and straight, adding another coat if necessary. Many of these large format stones are fitted with mortar joints, but you may need to use a larger 3/8” inch joint to make filling with mortar easier. Use spacers on all four sides of each unit to maintain uniform mortar joint gap, and remove carefully after the mortar has cured.
Joint Treatment & Wrap-Up
With your stones placed and spaced appropriately, you’re now ready to fill in your joint gaps. Make sure the mortar you use is smooth enough to flow easily through a grout bag. Carefully remove any excess setting board mortar from the joints before filling.
Fill in each joint gap evenly with mortar, being careful not to disturb the stones as you go along. Once filled in, wait until the mortar is thumbprint hard, then you can tool the joints as needed. Depending on your desired look, use either a tooling joint or a wooden stick to shape them.
After the mortar has had time to set, be sure to go over it with a masonry brush to remove any additional debris.
From here, it’s just a matter of cleaning up your worksite and letting your new wall or outdoor feature set. For more information on installing Cultured Stone outside your home, be sure to contact our talented design team!
Whether you’re moving into a new space or adding onto your current home, improving its aesthetics is key. It’s important to end up with a look and style you love, but it all has to tell your home’s unique story!
Simplistic spaces evoke calm feelings, but the opposite approach has its own benefits. One of the hottest trends in home design nowadays is “Maximalism”. From a design standpoint, it means more is more!
Mastering Maximalist design involves more than using quirky art or wild colors. But incorporating this style lets you get bold and creative as well! Your own design journey should be personal and evocative.
If you’re looking to add a touch of Maximalist metro mojo, using Cultured Stone is a great place to start! These cleverly crafted cultured stone veneers are a great way to give your home an impressive and stylish look.
Make Your Home Your Own
When you start designing, the first thing to consider is what you want the finished product to look like. What inspires you? Are there important details that you wish to display? What tells the story of your life and your creativity in the most elaborate way possible? The beauty of Maximalism is that it allows your space to be as unique and expressive as you are.
This is your chance to add those interesting design ideas that you’ve dreamed about! You’ve always wanted a cheetah print couch and a funky cobalt blue accent wall? Do it! This style works at its best when you combine traditional elements with funky pops of color. The end result is a room that is the personification of “you”!
Creating Trendy Together Spaces
There’s something magical about the communal component of urban living – no matter where. It’s time for your fireplace surround to soar like a within a historic brownstone home. Your wall between the den and the kitchen can function as an indoor window. There are many little touches that can bring any space together in a modern and stylish way. Cultured Stone makes it simple to recreate any urban and trendy looks! Even better, these manufactured stone veneers can be colored to match whatever the tone of whatever room you’re adding onto.
Embrace Your Outdoor Space
Whether your home has a rooftop escape or not, you should make the most of your outdoor space too. In addition, you can do it with any sort of space – even if it’s shared with neighbors!
You can spruce up your outdoor space with floral arrangements, in pots if needed. We also recommend adding murals or other artwork that reminds you of city parks. You can even add strand lights to help enhance that hip metro feel. If your backyard isn’t shared and you have extra space, you have an even better option. Try building a secret garden to give you a “private” feeling to remind you of other secluded gardens. Personal walkways or garden walls with Cultured Stone are the perfect final touch!
Don’t forget to make sure your outdoor space is fit for entertaining guests! A backyard getaway or rooftop escape is the perfect place to gather after sundown. Make it great for an evening under the stars by creating a conversation space. Be sure to equip it with lovely seating options around a Cultured Stone firepit or firebowl. With all the sizes and styles available, you can craft your own magical space to make lifelong memories!
Wherever you call home, whether it’s urban, suburban, or something more – it should match the needs of you and your family. By adding onto your home with Cultured Stone, you can create a warm and personalized space for anyone. Contact our talented team today to learn how we can help improve your home!

 For a quick and easy way to update the look of your kitchen, there’s no better solution than a coat of fresh paint on the walls.
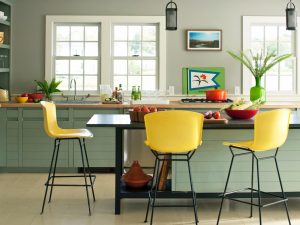
 will dictate the design of the room. Neutral walls work better with very colorful cabinets. So, if you want to go crazy with your kitchen paint colors, try opting for white cabinets instead.
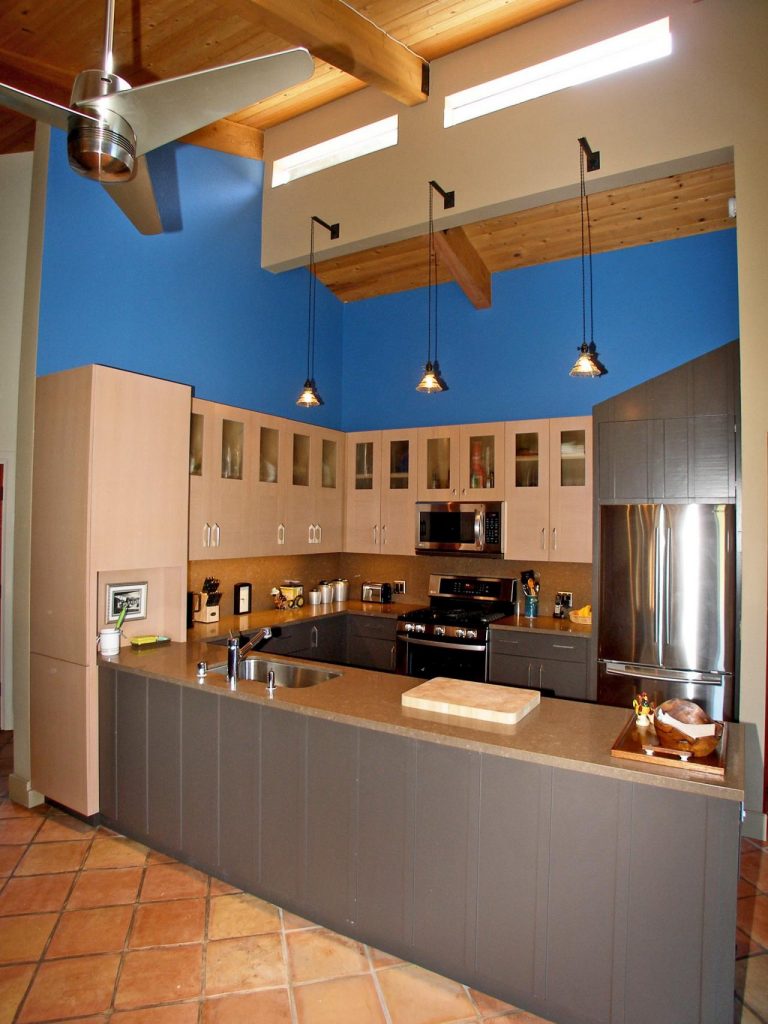


 There are many benefits to choosing a neutral color palette for siding and trim. For one, neutral colors appeal to the broadest range of potential home-buyers, making your home more marketable when it comes time to sell.
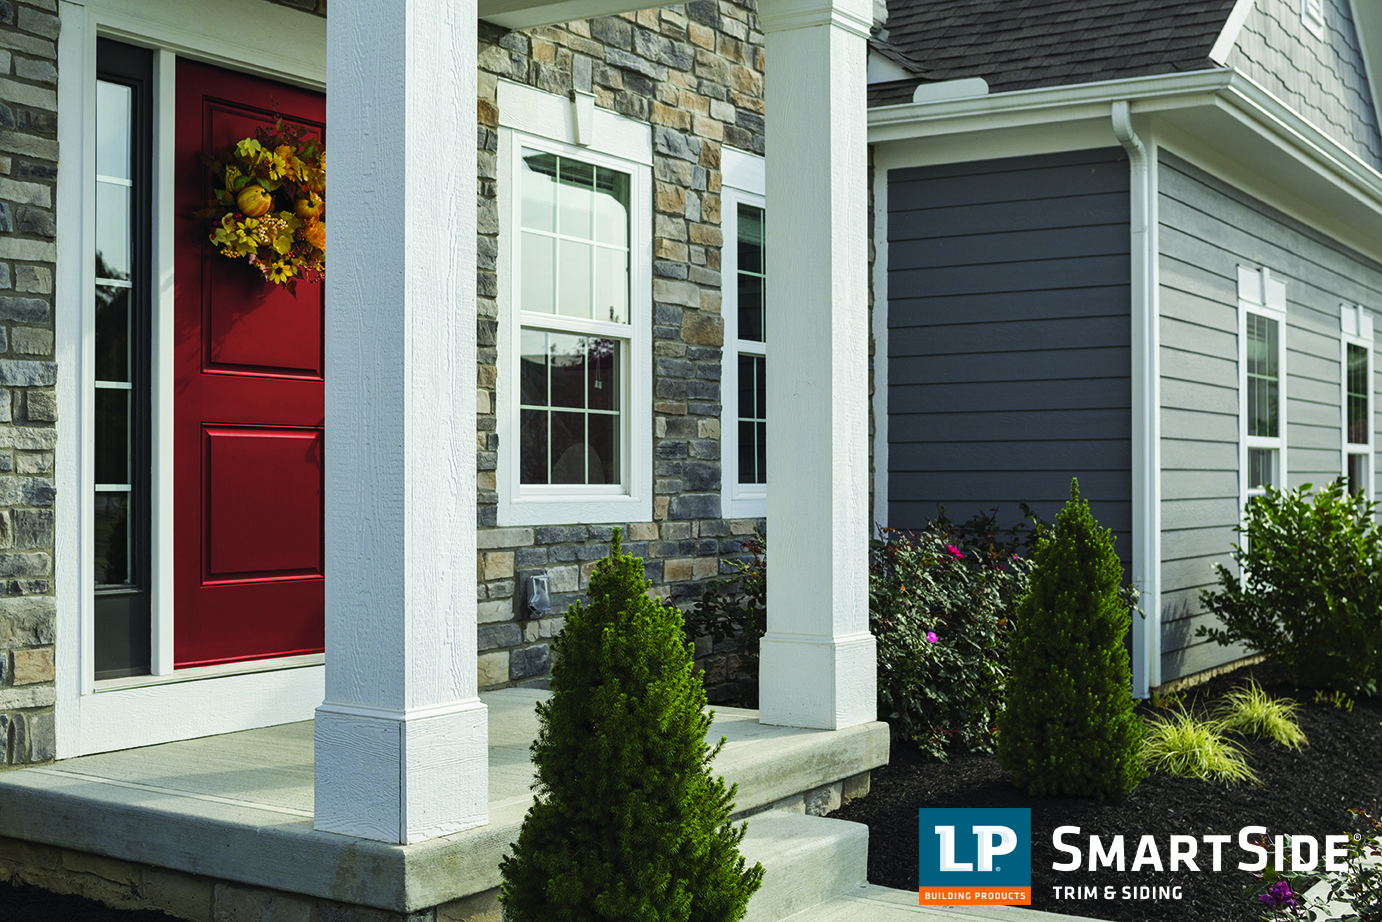
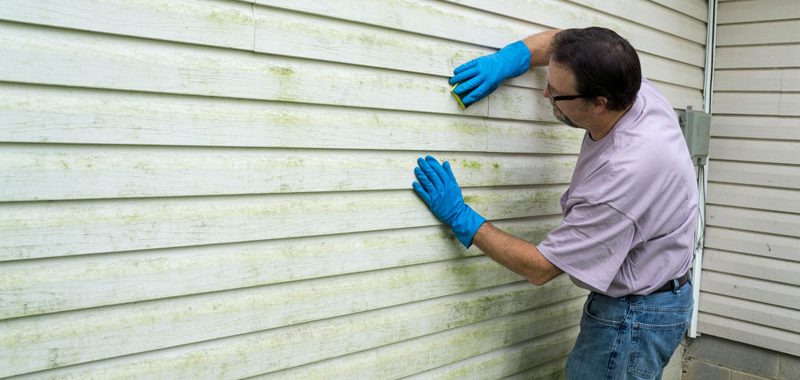
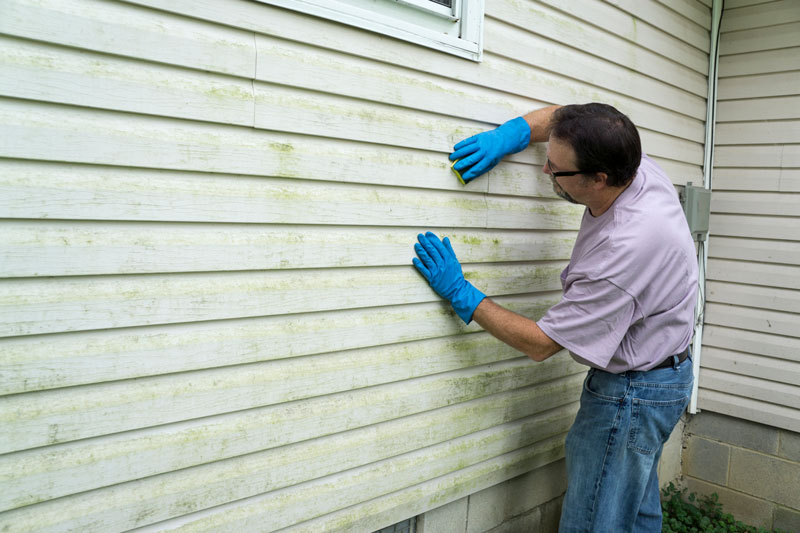 Keeping your home’s exterior siding in good shape is not only a great way to improve your home’s appearance, it also helps you avoid repairs and costly services down the road. With a bit of preventative maintenance, you’ll be able to extend the life of your home’s exterior siding for 50+ years!
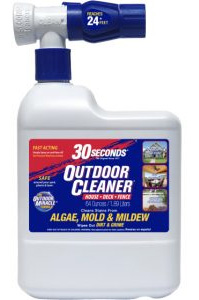 Next time you’re at
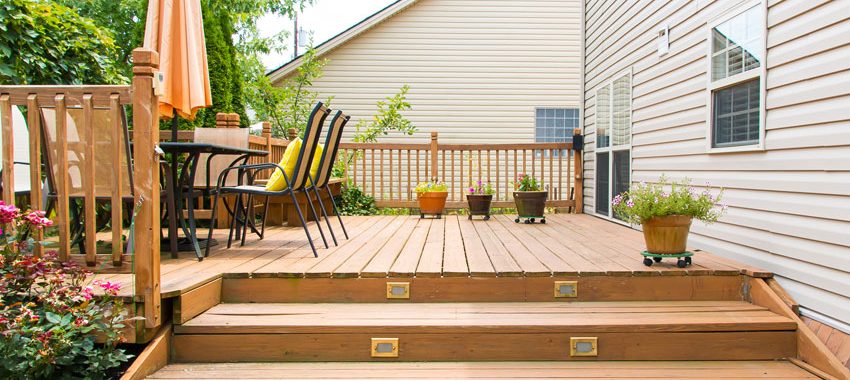
 Beautify Your Deck and Spruce Up Your Backyard!
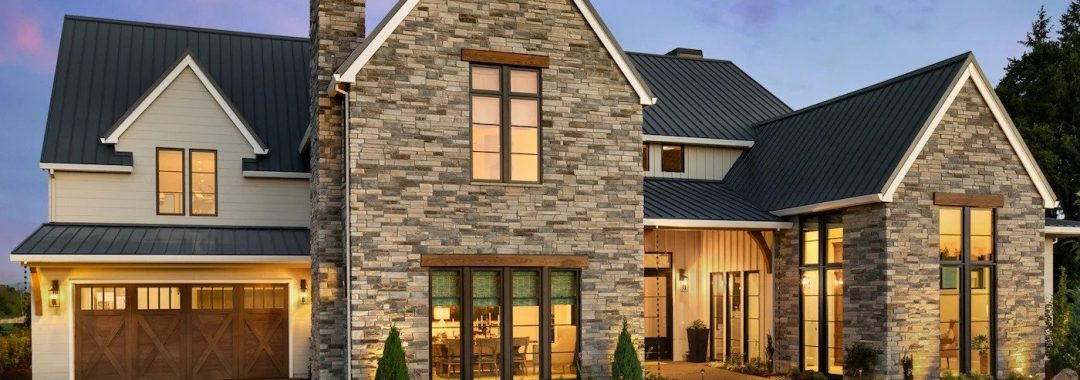
 Whether you’re moving into a new space or adding onto your current home, improving its aesthetics is key. It’s important to end up with a look and style you love, but it all has to tell your home’s unique story!