Kitchen by Kraftmaid

What’s the Timeframe for a Kitchen Remodel?

Kitchen by Kraftmaid

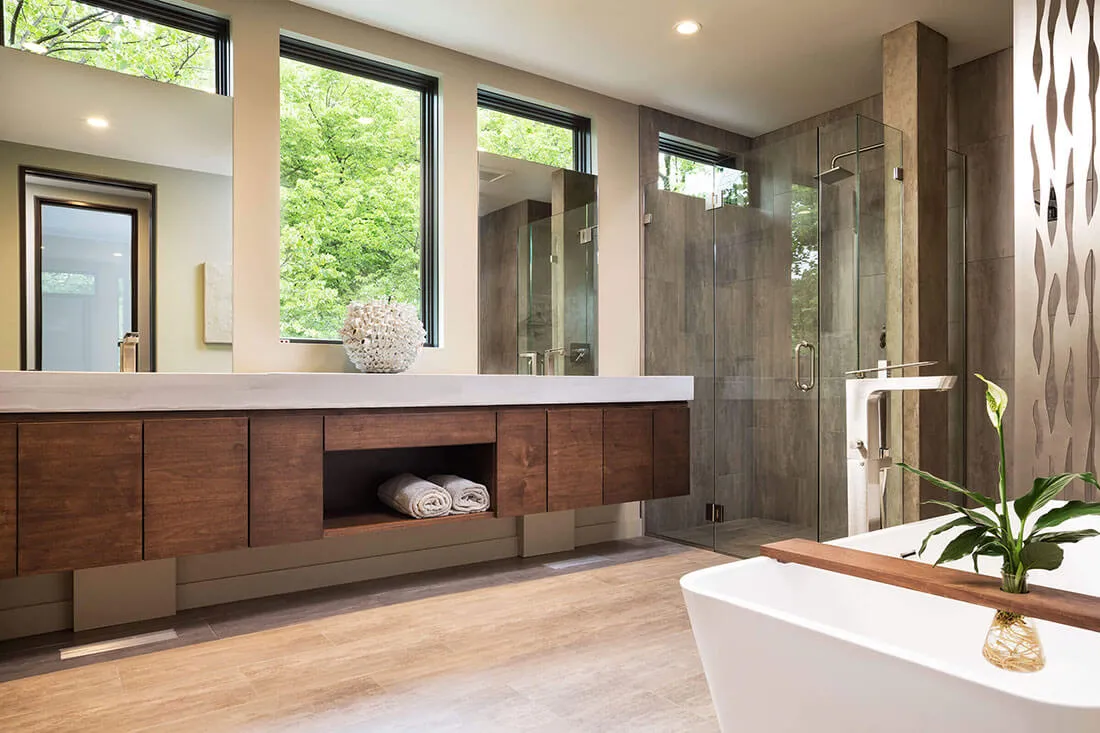
It’s exciting to plan a new kitchen, especially if you’ve been living with an outdated space. You envision sleek new countertops, cabinets, and appliances. You might even have the hardware and paint colors selected! But a kitchen renovation, like all home improvement projects, involves a very specific process. Knowing what to expect during a kitchen remodel and how long it may take, will help you and your whole family relax and enjoy the transition from an ugly old kitchen to a beautiful new one. Read on to learn what’s the timeframe for a kitchen remodel.
&nbsp:

1) Planning

Planning helps you figure out what your new kitchen will look like and how it will function. We recommend that you expect a 2-3 week timeframe for professional Kitchen Design renderings and consultations.

Look:
Start by setting a budget. This will help you figure out what products and brands you should start with.

Then look at different product galleries and photos, or visit showrooms. to get a feel for what styles appeal to you. There are many types of materials, hardware, colors, and finishes to choose from.

Finally, start a scrapbook or inspiration board. Place examples of tile, cabinets, flooring, sinks, lighting in there. Then as you figure out what you like, you can take it up a notch and create combinations. Just like the designers on the Home Improvement shows.

Function:
To get a clear picture of the space you have to work with sketch out the basic shape of the room, then:

  • Draw in all current counters, appliances, or other built-in fixtures.
  • Take measurements and record them on the sketch, so that you can best fit your new plans into the existing space.

If you plan to rearrange your kitchen layout, create a second sketch with your new plans.

Your goal is to explore your needs and goals for the space and decide how will it function. It’s easier and far less expensive to try out ideas on paper. Once you order materials and begin construction, changes are costly.

It helps to work with an expert GNH Kitchen Designer as you plan. They will make suggestions that can save you time and money, help you choose materials, and even create a 3D rendering of your kitchen design.
&nbsp:

2) Ordering

After your design is finished, approved, and all measurements taken, the product orders are placed. Expect a 4-6 week minimum for your cabinets, tile, flooring and countertops to arrive. Some products may take as long as 18 weeks. This gives you time to purchase fixtures, appliances and anything else you need. Don’t forget to figure out where you will cook and have meals during the construction phase. (You may need to set up a temporary kitchen and dining area elsewhere in the home.)
&nbsp:

3) Construction

Depending on the scope of your kitchen design project, construction can take a few days or weeks. Your contractor will have the best sense of the exact timeframe. During this stage, demolition and reinstallation of plumbing, electric, and HVAC is done if needed. If you encounter surprises and delays—they’re a normal part of every remodel, so just stay in close communication with your kitchen contracting team during the process.
&nbsp:

4) Installation

This is where the magic happens! Your new kitchen starts to come to life as your contractor lays flooring, installs new cabinets and countertops, as well as lighting, faucets, backsplash, and hardware. And before you know it, you’ll be enjoying your new kitchen!

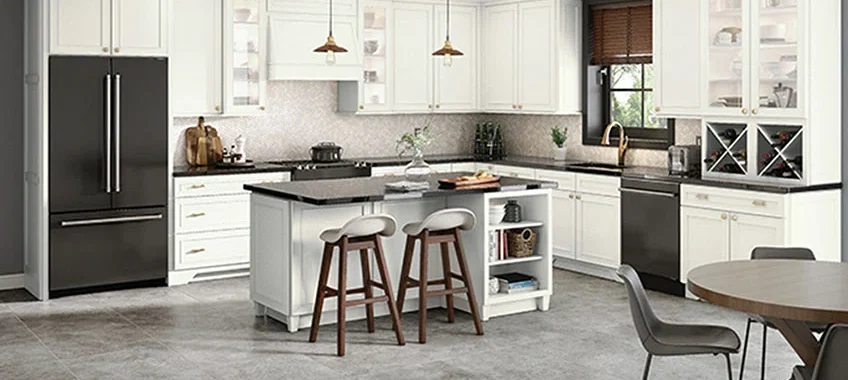
Top image is a featured KraftMaid Kitchen, click for details.  

home maintenance resolutions for 2018

5 Home Maintenance Resolutions to Keep This Year!

home maintenance resolutions for 2018 Start the year off on the right foot by giving your home maintenance projects top priority! How? By making a list of monthly to-dos and tackle them one at a time. Then, you won’t lose track of the home maintenance projects you want to get accomplished this year.

Not sure what home maintenance items should be on your list?

Here are 5 home maintenance resolutions to keep this year.

They are simple to do, minimal cost, and can help you save big money on costlier repairs down the road. So, if you’re getting cabin fever this winter, get to work and give your home some TLC!

1) Apply Fresh Paint

It’s always a good time for an interior painting project. So start by select some fabulous colors this winter! Painting is an inexpensive way to improve your home’s value and appeal. It can also help protect your walls from dirt and moisture, which may lead to bigger headaches later.
 
Wondering what to do? Go for broke and select a bold color to paint an accent wall in your living room. Or add dimension to your bedroom by painting the ceiling. You’re only limited by your creativity and imagination.

home maintenance-resolutions 2018 floor protection

2) Protect Entryway Floors

The elements of nature can wreak havoc on your entryway floors, including rain, snow, mud, and ice. Moisture and muck not only looks awful, it can destroy hardwood floors over time, leading to costly repairs.

So, how do you protect your floors from the mess? Place mats both inside and outside the door, along with boot trays inside the entryway. It will help if your mudroom is organized and ready with a place to dry wet jackets, hats, mittens and gloves.

3) Get Ahead of Ice Dams

Ice dams form when the edges of a house’s roof is colder than the rest of the roof, causing ice to form around the eaves. Snow melts above, and the melted snow backs up behind a “dam” of ice, potentially causing leaks and permanent damage to the roof and home — if you’ve ever experienced an ice dam on your roof-line, you know what a nightmare it can be!

Here’s what Houzz.com recommends if you notice the beginnings of an ice dam:

  1. Carefully remove snow and ice if possible without damaging roof and gutters.
  2. If you have heat cables, turn them on. Heat cables cannot prevent or fully remove ice dams, but can melt enough of the ice to create a channel for water to flow out, preventing some damage.

4) Maintain Your Hot Water Tank

Yearly maintenance of your hot water tank can improve performance, meaning more hot water when you need it, and less waiting for hot water to replenish. It can also help prevent expensive repairs (or even replacement) later.

Flush your hot water tank to remove sediment to save on the cost of replacing the entire hot water tank down the road. You can also wrap an older hot water tank with an insulating blanket to help conserve energy (and save you money). And these blankets prevent hot water heaters from losing heat in cold rooms and closets.

5) Keep Driveways and Walkways Clear of Snow & Ice

home maintenance-resolutions 2018 snow removalKeeping your driveway and walkways clear from snow and ice accumulation from each winter storm serves a dual-purpose. It prevents slips and falls, and allows for easy access by vehicles. But it also prevents excess moisture from seeping into the small cracks of your driveway or walkway and doing greater damage when it expands into ice. This moisture could potentially cause damage, resulting the need to repave your driveway or walkway prematurely.

Try removing the snow with easy-push shovels to save your back from strain (check out shovels, snow and ice removal tools available at GNH). Then add a sprinkle of salt or ice-melt to help the moisture evaporate when the sunshine returns.


As you go about maintaining your home and property, don’t forget that our expert team is happy answer your questions, offer guidance and provide time-saving tips!


Sources: “27 Tasks for Your Winter Home Maintenance Checklist”, FamilyHandyMan.com; Your Winter Home Maintenance Checklist”, Houzz.com.

Bathroom Remodel Photo from Marvin

Create Your Own Oasis with these Bathroom Remodel Ideas

Bathroom Remodel Photo from Marvin

A Restroom Retreat

Your bathroom is one of the most private, secluded spaces in your home. It should be a space that invites relaxation and solitude. If you’ve been looking to improve your bathroom, now’s the perfect time. But before starting any sort of home remodel project, you need to have a set style in mind. Your preferred style will influence your entire bathroom remodel. Everything from the tools you use to the brands and hardware you select. Don’t worry if you’re feeling stuck on style ideas either. We’ve prepared a list of some of the most popular bathroom styles in use throughout the country to inspire you!

Modern Farmhouse Style Bathrooms

Farmhouse style bathrooms are one of the most popular styles in the housing market. The key to this look is blending both rustic and modern vibes. We recommend focusing on wood trim and furnishings to best accomplish this. Focusing on the details is important to creating the aesthetic. For the best complementary look, try to use matte hardware or natural wood. We also recommend searching antique shops or auctions for barn doors or soaking tubs to really complete the rustic look. The lighting you choose will also play a large role. Look into larger windows that supply natural light, or industrial hanging lights, as these suit the theme best.

Beach Style Bathrooms

Beach style bathrooms can take on many different looks, depending on your preference. Whether you want to create a calming, ocean atmosphere, or a more exciting animal, aquatic theme; blues, greens, cremes, and browns should be your colors of choice. White tile flooring is also a good option if you want to blend all your calming colors with the entire theme of the room. For a more retro beach style, be sure to incorporate wood flooring to give your bathroom a touch of tiki. Don’t forget the small touches either! Small-scale accents, like patterns on a mirror or cabinet, can make all the difference.

Minimalist Style Bathrooms

If your focus is on transforming your bathroom into a space for peace and quiet, the minimalist style is just for you. To make this style work, you should focus on muted colors, reflective surfaces, and glass hardware or appliances. A floating vanity or sink, for example, provides a sleek and understated look with plenty of functionality. Monochromatic designs can make your entire bathroom remodel project simpler, while also complementing the colors you chose for your bathroom. You can also focus on hidden storage features to make the most of your space, such as toe-kick drawers or hidden double drawers.

Botanical Style Bathrooms

To really add some life and vibrancy to your bathroom, consider a botanical style theme! When choosing your colors, we recommend focusing on luscious greens, dark browns, matte black, and maybe a few pops of floral color. One of the best things about this style is that you can go with either a light or dark theme. For either theme, you should use either wood flooring. or white or grey tile with a nature themed rug or shower curtain. Again, the little details will bring the entire theme together. Wicker adornments, nature themed shower curtains or rugs, and even real houseplants are the perfect finishing touches.

The Next Steps

Once you’ve decided on a style for your bathroom remodel, you can move on to the next exciting phase! You should now begin to think of the costs and supplies needed and set a preliminary budget. At this point, consulting with a bathroom designer can help you make sure your dream design comes to life. At GNH Lumber, our talented team is ready to help you with every step of the way.

Ready to begin your bathroom remodel? Get in touch with us today – we’re ready to help you craft your own personal bathroom oasis!

Must have Tools

Must-Have Tools for Home Improvement Projects

Must have Tools

Do you like to tackle your own home improvement and woodworking projects? Maybe there’s a DIY-er in your family who spends more time in the workshop than in the house! If you are working on home projects, you’ll probably need a few tools to round out your collection.

To help you along, we’ve compiled a list of must-have tools for home improvement projects that will help you get things done faster and easier.

1) Hammer

Pounding nails, pulling nails, tapping things into place — it almost goes without saying that you need a quality hammer. An expensive hammer is long and lightweight; its leverage can assist you when you take that wall down.

2) Screwdrivers

A Philips or X-shape screwdriver is probably one of the most common tools in any toolbox. If you have a handle that accepts interchangeable tips, you can cover a wide range of screw types and sizes.

A flathead or straight screwdriver is invaluable; most light switch plates use straight screws, for example. Having the right size flathead can make a difference, so start with at least a set of three
(small, medium and large) to be able to handle most jobs.

3) Tape Measure

Your tape measure is indispensable for estimating material quantities, figuring out placement of objects, and calculating floor plans and furniture sizes. It’s always a good idea to measure more than once to make sure you’ve got it right.

4) Utility Knife

From cutting paint around windows that are stuck closed to opening boxes, scoring drywall or even trimming the edges of carpet, the uses are so many that you’ll be surprised how you ever got by without one.

5) Level

Nobody can accurately “eyeball” something to tell whether it’s level or not, and slight errors will make frames, shelving, floorboards, or other objects look completely off-line. This tool takes all the guesswork away. In fact, it can’t hurt to have several levels of various lengths.

6) Putty Knife

A putty knife is great for scraping dry glues and paints and for spreading putty, paste and spackle. Having a 1½-inch size for scraping and a 5- or 6-inch one for spreading is infinitely helpful, and will pay itself back quickly over the years.

7) Power Drill

Drilling implies creating holes, and a power drill is the ultimate luxury when tired hands have turned too many screws. It adapts not only to drill bits to bore holes, but also to every kind of screw-head bit, making larger projects go quickly and with less muscle. Just be careful to stop when the fastener is tight, so you don’t strip the screw head. You will appreciate this tool’s power.

8) Reciprocating Saw

If you’re cutting wood for any number of home improvement and DIY projects, you will find that a reciprocating saw is an essential workshop tool. A reciprocating saw is an all-in-one tool that can take the place of several others. It uses a pull and push blade motion to cut in hard-to-reach places where no other type of saw can fit.

9) Miter Saw

A miter saw has a specialized blade that allows you to cut at a variety of angles, making it easily one of the most useful tools in the workshop. Making cuts for crown molding, picture frames, door frames, or window casings? A miter saw is your tool! The saw blade is mounted on a swing arm that pivots left or right to produce the perfect angled cuts each and every time.

10) Cordless Grinder

For metal cutting, smoothing or grinding, nothing but a cordless grinder will do! If your projects involve masonry or concrete with misplaced re-bar or anchor bolts, this handy tool will prove quite the workhorse over time. Or slice through plaster or stucco without ripping out the expanded metal lath.

11) Nail Set

A nail set is used for sinking nail heads below the surface of the wood, so that you can then fill the hole with wood putty and sand it, to make the nail disappear. This way the hammer never has to make an ugly dent in the surface you are pounding.
Looking for the perfect tool – whether it’s for you or a fellow DIYer? Visit your local GNH Lumber today to browse our selection of DeWalt, Stanley, Bostitch and Paslode hand and power tools!

How to Choose Paint Trim

How to Choose a Paint Finish

How to Choose Paint Trim
Did you know that picking the right paint for your interior painting project involves more than just color selection

You also need to choose the right paint finish. Didn’t even think about the finish, did you? That’s ok! A lot of people underestimate the role paint finish plays in the appearance of your newly-painted room.

Choosing the right finish for your interior project will affect the look, durability, and ambiance of the room. Understanding the basic differences between paint finishes will help guide your selection process.

The most common interior paint finishes are: flat, matte, eggshell, satin, and semi-gloss. Let’s take a closer look at these 5 options:

Flat

Flat finish is only available in latex paint. It’s clean, opaque qualities make it a great choice for walls and ceilings. It is also the least shiny finish available. Unfortunately, it doesn’t clean well. So don’t use it for kitchens, bathrooms, or children’s bedrooms. The only way to get rid of drawings and fingerprints on a flat-finish wall is to paint over them!

Matte

Matte finishes are also low-shine. It’s perfect for busy areas such as hallways, family rooms, and kids’ rooms. It’s easy to apply, washable, and hides existing wall colors well.

Eggshell

Eggshell finishes are used for decorative finishes because it provides a low shine. It cleans up better than a flat finish would, but probably not as well as you would want in a kitchen or bathroom.

How to Choose a Paint FinishSatin

The most popular paint finish is the satin finish. It has more sheen than eggshell, and cleans better too! This finish is a good choice for woodwork, walls, doors, and hallways. It’s also great for bedrooms and dining rooms. While this finish is washable, it’s not “scrubbable,” so this is another one to skip if you’re painting a playroom.

Semi-Gloss

A semi-gloss finish will give your room a subtle shine. It’s scrubbable without being too shiny. This makes it perfect for moldings, doors, windows – and little Picasso’s bedroom, too. However, because Semi-gloss finishes reflect light, imperfections in your walls are more noticeable. We recommend that you prep your walls and make them super smooth before applying paint.

Not sure which finish best matches your project? Check out this product comparison guide from Benjamin Moore.

Choosing the right paint finish is as important as picking a color. Not only does it impact the appearance of your room, it has a big effect on how well you will be able to clean and maintain your walls!

Now that you know which finishes to use, you are ready to pick out paint for your next project. Still not sure or need more help? Ask a GNH expert in our Greenville or Windham locations. They can help you make the best choice for your home improvement project.

Vinyl Window Care

How to Care for Vinyl Windows: “Do’s and Don’ts”

How to care for vinyl windows?

Are you wondering how to care for vinyl windows? Vinyl windows are designed for easy care and maintenance. Just a tiny bit of elbow grease from time to time will extend the life and beauty of your windows.

Below are some quick and basic tips for caring for your vinyl windows. Following these “do’s and don’ts will extend the life and performance of your vinyl windows:

Vinyl Window Care “Do’s”

  • Vacuum soil and debris from the sill or track before washing.
  • Use a mixture of mild dish soap or any non-abrasive soap and water to gently clean window frames.
  • Rinse thoroughly and dry with a soft absorbent cloth.
  • Make sure any weep holes are clear of obstruction and draining properly. Weep holes help your window drain and are located on the bottom of the window.
  • Remove the screens and wash them with a soft brush on a flat surface with mild dish soap and water.
  • Check the weather stripping around all window sashes in the fall.
  • Occasionally lubricate moving parts including rollers and tracks. Make sure to test the lubricant on an unseen part of the window to ensure it doesn’t stain.

Vinyl Window “Don’ts”

  • Don’t use abrasive or caustic cleaners or solvents as they may damage the finish of your windows.
  • Don’t wash windows in direct sunlight, if possible.
  • Don’t use a high-pressure spray to wash the windows as it may damage the insulation and glass seal.
  • Don’t use sharp instruments or abrasive pads to clean the glass.
  • Don’t attach anything to the glass, such as masking tape. Heat from the sun may bake the adhesive into the glass, and make it difficult to remove.
  • Don’t use a silicone spray on plastic parts as it may damage them; use a non-wax furniture polish instead.

Vinyl windows are a great investment for your home. Ask one of our GNH Experts about vinyl windows or visit our showrooms to see the latest styles and options for yourself!

Exterior Painting Project

How to Paint the Exterior of your Home

Exterior Painting Project

Early autumn is a great time of year to tackle your home exterior painting project. The temperature is warm during the day and the humidity is low. This means quicker drying times. If you’re not sure how to paint the exterior of your home, you will want to:

  • plan ahead
  • buy enough paint in the same color
  • tackle the job one section at a time

With a little planning, your home exterior painting project will be fun and satisfying!

Step 1: Envision the Final Product

Select a color palette for your home’s exterior walls, trim, shutters, and doors. There are some tried and true color combinations that are beautiful, taking the guesswork out of choosing colors.

Use Benjamin Moore’s Personal Color Viewer tool. It will help you visualize the end result. Plus it will list compatible paint colors by name and product number for easy reference. Tip: Basic whites, light blues, light beiges, and yellows work best for resale curb appeal.

Step 2: Prepare the Exterior Surfaces

A clean and debris-free exterior is best for holding paint. Before you apply paint, spend a day preparing your home’s exterior. The first step is sanding or scraping old and peeling paint. Then, check for gaps between the siding and windows. Caulk where needed, or replace lengths of siding or shingles. Finally, use a power sprayer to thoroughly wash your home’s exterior. Don’t forget to allow a couple of days to dry completely before applying paint.

Step 3: Planning & Prep

Watch your weather forecast. Then choose a stretch of warm, dry days to start painting. Plan on having a couple of days (a weekend) to work.

Make sure you buy more than enough paint to cover your home’s exterior. It’s helpful to get a little bit more than you think you will need for touch-ups.

Before you paint, place plastic tarps or drop cloths over walkways, shrubs, and grasses. This helps protect against spilled paint. Also, move or cover up any outdoor furniture, hoses, or grills, that are close to the house.

Step 4: Use Paint that includes Primer

Look for a paint that has combined primer and paint into one product. This will cut down on the number of coats you will have to apply.

Step 5: Start at the Top and Paint Down

Start at the top and paint down to control streaks and drips. This method will allow you to feather out mishaps in the direction you are working.

Why Should I Stain My Wooden Deck?

How to Choose and Apply Deck Stain

Why Should I Stain My Wooden Deck?

Why Should I Stain My Wooden Deck?

Your outdoor space is where you and your family share meals and memories. You’ll want it to be welcoming all year round. So, if your wooden deck is fading or peeling, a new coat of stain goes a long way to restoring it to beautiful condition!

Gather Your Gear

Before you can begin the staining process, you are going to want to have all the right tools and gear on hand! The quality of your tools means professional-level results. Before you start prepping your deck for staining, we recommend gathering the following equipment:

  • Gloves
  • Safety glasses
  • Broom
  • Garden hose
  • Drop cloth
  • Sanding sponge
  • Stiff synthetic-bristle brush (make sure it’s specific to oil, water-based formulations)
  • Pump sprayer (optional)
  • Roller covers
  • Extension pole
  • 4″ brushes (make sure they’re specific to oil, water-based formulations)

How to Choose the Right Deck Stain

From clear to solid colors, there are so many choices in opacity and color to choose from. Following these simple tips on choosing the right deck stain for your wood deck will help you get your project started.  Staining your deck is one of the easiest ways to update the exterior of your home and make it the perfect space for years to come.

Prepping Your Deck For Staining

Prepping Your Deck for Staining - Rinse Cleaner

Before you apply the stain to your deck there is some prep work that needs to be done. Follow these steps to prepare for applying stains. Make sure the surface is clean (no dust, dirt, wood fibers or grease), dry and free from mildew. If a surface is not cleaned and prepared properly, the stain may not adhere well.

  • Sweep the deck to remove debris.
  • Apply cleaner using a roller or pump sprayer (remember to wear protective equipment to avoid contact with skin and eyes).
  • Allow the cleaner to set for 15 minutes. Mist your work area with a garden hose to keep it wet while the cleaner soaks into the wood.
  • After 15 minutes, work the cleaner into the surface using a stiff synthetic-bristle brush. Scrub to remove residue thoroughly.
  • Completely rinse the cleaner from the wood with a garden hose.
  • Once the surface is clean, dull, and dry, you may apply stain or coating,

How to Apply Deck Stain

Work with the wood grain and apply an even coat of stain using a 4-inch brush. You may also use a roller to first apply the stain, and then work into the wood with your brush. Remember to always read the products’ details and instructions. There may be additional steps that are recommended.

For the best results, you will want to avoid staining midday or in direct sunlight. And avoid using your deck for 24 – 48 hours so it can dry thoroughly.


How to Create an Accent Wall with Stripes

How to Create an Accent Wall with Stripes

How to Create an Accent Wall with Stripes

Want to give your living room or hallway a fresh and modern look? Maybe you want your kid’s bedroom to look as fun, vibrant and full of personality as they are. It’s easy to create a dramatic effect by painting a bold accent wall! And the best part about this DIY project is that it’s fun and inexpensive!

Painting the interior rooms of your home can have tremendous impact, and it’s a great autumn project with a modest price tag.

Strive for a balance of linear elements and colors, and don’t be afraid to ask the experts at GNH Lumber for guidance and tips along the way. Get your painting project started!

Here’s how to create a bold accent wall with stripes!

What You’ll Need to Pick Up at GNH:

  • FrogTape® Painter’s Tape
  • Benjamin Moore Interior Paint
  • Wall Primer
  • 2-in. Paint Brush
  • 9-in. Roller
  • Drop Cloth
  • Two Paint Trays
  • 220-Grit Sandpaper
  • Damp Sponge


Step 1:

Protect floors with a drop cloth, fill any nail holes and sand the wall. Wipe away dust with a clean, damp sponge.

Step 2:

Apply FrogTape® Painter’s Tape just beyond the corner of the adjacent wall to ensure a crisp, clean line.

Step 3

Prime wall if changing from a dark to a light paint color.

Step 4

Paint wall using a ‘W’ shape with a roller until the whole wall is covered evenly.

Step 5

Remove the painter’s tape when the paint is still wet.

Step 6

When the accent wall is dry, start decorating.


How to Paint Stripes on a Wall

Want to make a bold, unique statement? Stripes that go up-and-down make a room with low-ceilings look taller, where horizontal stripes give a smaller room a more spacious feel. And remember, the thinner the strips, the busier the pattern, too.
How to paint Stripes on an accent wall
Here are a few tips to paint level, even stripes on your walls.

Step 1

Paint your base color across the entire wall using the lighter and flatter shade of the two colors you picked. Let it dry for at least 24 hours.

Step 2

Figure out your stripe spacing. Choose a stripe width that can be evenly divided into the wall’s width or height. Generally, 4-12 in. is a good width. For vertical stripes, measure the width of the wall and for horizontal stripes, measure the height of the wall.

Quick Tip: Paint an odd number of stripes on your wall. This makes sure you’ll get a solid strip at the edges of the wall or ceiling.

Step 3

Create your outline. If using a level and pencil, mark your stripe widths across the wall. With your level, draw a light line continuously across, making sure the level is straight.

How to Create an Accent Wall with Stripes

Step 4

Mark an “X” where you want your solid stripes to be.

Quick Tip: Create a guide the exact width of your stripes and use it to make your marks

Step 5

Apply the right FrogTape® product for your surface

Quick Tip: Place your tape on the outside of your pencil line so the paint will cover up any markings.

Step 6

Burnish or seal the edges of the tape. Run a plastic toll along the tape’s edge so paint can’t bleed through.

Step 7

Pull the tape off when the paint is still wet at a slow, 45-degree angle backward toward the wall. Don’t forget to control the end of the free tape so it doesn’t drag along the freshly painted stripes.

Painting stripes takes time and patience. Just follow these steps to prepare the space and you’ll be sure to make your stripes look crisp and straight.


Sources: https://www.frogtape.com/inspiration/tutorials/projects/update-your-room-with-an-accent-wall; https://www.frogtape.com/inspiration/tutorials/projects/how-to-paint-stripes-on-a-wall

Creative Ways to Paint Your Bedroom

5 Creative Ways to Paint Your Bedroom

Creative Ways to Paint Your Bedroom

One of the easiest ways to transform the look and feel of your bedroom is with a fresh coat of paint! Creating signature style in your master bedroom starts with you. What colors, textures and elements make you feel most relaxed and cozy?

Don’t forget that inspiration can come from anywhere! Think about fabric, wood, stone, or artwork. Whatever gives you restful comfort at the end of the day and helps you wake up energized in the morning is all that is required.

Finding sanctuary at the end of the day is something we all crave. Creating a personal retreat in your bedroom is easier than you think! Strive for a balance of textures and colors, and don’t be afraid to ask the experts at GNH Lumber for guidance and tips along the way.

Get your painting project started!

Here are 5 creative ways to paint your bedroom and inspire a new color pallet!

1) Modern:

Creative Ways to Paint Your Bedroom - Modern

Photo Source: Houzz, https://www.houzz.com/photo/47521799-dominion-contemporary-bedroom-moscow

Contemporary design is less ornate but bold in color and design.


Create some drama with dark tones, natural elements and cream accents. This earthy sanctuary incorporates natural oak floors and a wood accent wall behind the bed. The color pallet is derived from the tones found in the wood. Smokey neutral hues provide the foundation for the subtle drama of dark and light tones in the fabric and the ceiling.

If you have a tray ceiling layer, use light, medium and dark tones to add interest and depth to the architecture. This color pallet uses Benjamin Moore Barren Plain in the center. Keep the ceiling and the tray edges white and tape off a shadow line with Scotch Blue painter’s tape to create a darker border about 1.5-2” wide in Wildwood Crest. This will create that dark inner edge that adds depth to the ceiling tray.

Benjamin Moore Colors used in fabrics, furnishings and walls:

Walls: Barren Plain 2111-60; Bedding, Drapery: Mink 2112-10; Furniture: Black 2132-10; Chair/Shadow Line: Wildwood Crest 1538.


2) Vivid

Creative Ways to Paint Your Bedroom - Vivid

Photo Source: https://www.houzz.com/photo/238678-casa-paralea-eclectic-bedroom-miami

Bold color stories create a vibrant environment that makes even the darkest winter day feel like springtime!


This bedroom achieves its sunny, tropical vibe by using a vibrant green fabric to create the color story.  Pulling greens and yellows from the inspiration fabric dictates a lively color palette. Try painting three yellow or pale yellow-green accent walls to add vibrancy. Get clean painting lines by taping off the corners and edges with Scotch Blue painter’s tape.

If you’re feeling adventurous, you could do a Strié finish using the contrasting color over the three yellow walls, or just the bed wall. Strié is a popular form of faux painting using glaze and paint brushes to create a soft natural striped texture. Here’s how to do it:

  1. Tape off the corners, ceiling line and the baseboards with Scotch Blue painter’s tape.
  2. Add some glaze at a 2:1 ratio to the paint and apply it in 2’ wide sections.
  3. Drag a wall paper brush or a long bristle Strié brush through it from ceiling to floor to create subtle stripes.

Practice this technique first, you may need to go over it multiple times to achieve the effect you are after. It works best done over eggshell paint to extend the working time.

You may need to use a smaller soft brush at the ceiling and baseboard to smooth it out. And don’t limit yourself to just painting the walls: a brightly-painted side table pulls this scheme together nicely!

Benjamin Moore Colors used in fabrics, furnishings and walls:

Walls: Hibiscus 2027-50, Flower Power 398; Table: Orange Nectar 2013-20.


3) Textured:

5-Creative-Ways-to-Paint-Your-Bedroom-TEXTURE

Photo Source: https://www.houzz.com/photo/90957482-woodside-eclectic-bedroom-london

Paint is a medium that can take on many forms.


The use of unique materials can be transformed by paint. It redefined the tin or textured wallpaper panels on this wall.

This look was achieved by painting these wall panels alternately with a base coat of Summer Harvest and Blue Heron, then employing additional colors to help accent and contrast the textures. The other neutral walls allow the bed wall to make a huge statement.

Don’t forget to be creative! Instead of covering the entire wall, you can frame out an oversized headboard area to fit 9 of these tiles for a scaled down effect. Frame the area out with wide mitre corner boards painted Hearthstone Brown.

Benjamin Moore Colors used in fabrics, furnishings and walls:

Ceiling & Walls: Seapearl 961; Tin/Textured Tiles: Gingersnaps 1063, Hearthstone Brown 2109-20, Summer Harvest 2016, Blue Heron 832.


4) Deep

5-Creative-Ways-to-Paint-Your-Bedroom-DEEP

Photo Source: https://www.houzz.com/photo/90957482-woodside-eclectic-bedroom-london

Dark tones are very tranquil and relaxing in a bedroom.


Darker colors absorb light, creating a womb effect to induce deep relaxation. Creating contrast with soft neutrals makes this space feel comfortable and welcoming.

Painting the wall behind the bed a slightly lighter shade of Bella Blue will provide subtle contrast to the remaining darker walls defined by Salamander. The trim is a shade of gray with the ceiling a lighter tone of gray. To keep the lines clean, tape off the trim with Scotch Blue painter’s tape.

This room has a very sophisticated use of color with simple clean lines, which gives the moldings and artwork center stage.

Benjamin Moore Colors used in fabrics, furnishings and walls:

Bed Wall: Bella Blue 720; Rest of Walls: Salamander 2050-10; Trim: Timber Wolf 1600; Ceiling: Heaven 2118-70.


4) Graphic

5-Creative-Ways-to-Paint-Your-Bedroom-GRAPHIC

Photo Source: https://www.houzz.com/photo/841470-masterpiece-design-group-contemporary-bedroom-orlando

Creating architecture with color and simple moldings gives this room a modern feel.


The walls are painted a Natural Linen tone. Tape off the simple rectangles with Scotch Blue painter’s tape to approximately 6” wide, or use mitered wood painted Alabaster.  Paint the inside color (above the lamps) with the darker shade of Aged Bronze to provide some contrast and interest against the dark lamp shades. Black is a strong modern component in the fabric design, lamps, accent tables and upholstery.

Providing a neutral backdrop gives the design elements a chance to be seen. It has been said that every room should have black to ground the design. That is very true of this room.

Benjamin Moore Colors used in fabrics, furnishings and walls:

Walls: Natural Linen 966; Wall Molding/Blocks: Alabaster 876; Inside of Wall Molding/Blocks Above Lamps: Aged Bronze 231; Side Table: Black 2132-10.