KITCHEN PAINTING MADE EASY

Kitchen Painting Made Easy: 7 Easy Steps

1142189-pa1340-1142190-pa3314

If the idea of painting your kitchen sounds intimidating to you, then read on! Refreshing your kitchen with a beautiful coat of paint is much easier than you think – and fun, too! The truth is, you really can save the cost of hiring a professional painter while achieving the same great results. Here’s how:

Follow these 7 easy steps to get your kitchen looking fresh and new without breaking the bank!

  • Step 1: Cleaning.

    Clean the ceiling and wall surfaces that you plan to paint using water, a mild dish soap, and a cellulose sponge. Removing all dust, dirt and grease spots ensures a smooth finish!

  • Step 2: Prepping.

    Remove all electrical switch and outlet covers, wall sconces, picture hangers, and any other wall fixtures or attachments. Tip: Keep track of outlet screws by taping them to the covers as you go, something that I have learned the hard to do the hard way!

  • Step 3: Taping Off.

    Start with the ceiling. Use painter’s tape to mask around windows and woodwork such as baseboard, ceiling moldings and door frames. Once you apply the tape, run a plastic tool or putty knife along the tape to secure it firmly at its edges, and keep the paint from seeping underneath.

  • Step 4: Cutting In.

    Once you have masked everything you don’t want to paint, it’s time to “cut in.”  This means using a brush to cover the areas you can’t reach with a roller. Starting at the corner of the room, use a 2-inch or 2.5-inch trim brush to “cut in.”  Apply a three-inch wide strip of paint around the perimeter of the room where the wall and ceiling meet.

  • Step 5: Painting the Ceiling.

    Using a roller, you will now begin to paint your ceiling. Remember to remove any excess paint on the roller by slowly rolling it back and forth over the ridges of your paint tray. Begin painting in a corner of the room, blending the paint into the line you created in step 4. Paint across the width of the ceiling rather than the length of the ceiling.  Tip: Avoid straining your back and neck by rolling with a motion across your body (left to right).

  • Step 6: Painting the Walls.

    Once your ceiling is dry, you can begin to paint the walls.  Return to the same corner where you started to paint the ceiling.  Use a trim brush to carefully cut in along the wall-ceiling line. Extend that line two to three inches out from any windows, doors, or moldings. Once you’ve cut in around an entire wall area, use a roller to fill in the field. Tip: For efficiency, start in the corner of a wall and roll on a three-by-three-foot W pattern, then fill it in without lifting the roller. Continue in 3-foot sections until you’re finished, and only paint one wall at a time.

  • Step 7: Painting the Trim.

    Once the walls are completely dry, apply painter’s blue tape where the trim meets the wall. Paint the moldings, baseboard and the door and window frames with a two-inch angled brush. Paint the tops of the doors and windows first and work your way down so that you can remove any runs as you go. Baseboards should be painted last.

It’s that simple!  Remember to take your time throughout this process and enjoy your new kitchen color!

Canning Tips

Step-by-Step Canning Tips

Canning TipsCanning fruits, vegetables, sauces and preserves may appear difficult at first, but once you become familiar with a few basic techniques and precautions, you’ll find it quite simple, and enjoyable. Here are a few basic canning tips to keep in mind.

Canning success comes from always remembering two general rules:

  1. Use the best produce you can find, and;
  2. Make sure your jars are properly sterilized and sealed.

Sterilizing

  • Never use jars with any chips or cracks. Wash the jars, lids, and screw bands thoroughly in hot, soapy water, making sure to rinse well. One-quart mason canning jars (available at GNH) are perfect for most canning projects. The come in both regular and wide mouth openings.
  • Place the jars upright on a wire rack in a large pot, fill pot with hot water until the jars are submerged, and bring the water to a boil. Boil for 10 minutes, turn off the heat, and leave jars in the water. Sterilize the lids according to the manufacturer’s instructions.
  • Using stainless-steel tongs, lift the jars from the pot, and place them on a padded layer of clean towels. If you don’t have tongs, a Canning Set (available at GNH) has all of the tools you will need to have a successful canning experience.

Sealing

  • Pour fruits or vegetables into the jars, and wipe the rims carefully. Each jar should be filled to a quarter-inch from the top.
  • Eliminate air bubbles by poking through the contents of the jar with a chopstick or wooden skewer.
  • Place the lid onto the rim and the screw band over the lid. Use one finger to press and hold the lid securely in its center. Twist on the screw band until it’s tight.
  • Put a wire rack on the bottom of a large pot, and fill the pot with hot water. Use a jar lifter to place each jar on the rack. Add enough water to cover the jars by 2 inches, and bring the water to a boil.
  • Boil the jars for 10 minutes; remove from the water with a jar lifter, and allow the jars to stand on the towels for 24 hours. When the jars are cool, check for a slight indentation in the lid, this indicates a vacuum seal.
  • Finally, store your jars in a cool (50 to 70 degrees Fahrenheit), dry, dark place. Use within one year.

It’s as simple as that! Now you can enjoy your own homemade canned goods and be proud of canning them yourself.

Keep Your Pool Water Clear

How to Keep Your Pool Water Clear this Summer

Keep Your Pool Water Clear

Summer is finally here, hot and humid days are upon us, and there is no better way to cool down and relax than a dip in your pool. Unfortunately, the bacteria and algae that form in your pool can prevent you from enjoying it. The best way to keep your pool water crystal clear and safe is through prevention.

Here are the important preventative steps to make sure your pool is clean and ready to enjoy at all times:

  • Maintain proper disinfectant levels. Every pool (even the best kept ones) have germs and bacteria. Keeping the chlorine above 1 ppm will eliminate them. Use a professional grade chlorinating solution like Smart Liqui-Shock by Sunbelt Chemical (available at GNH) to disinfect and clarify pool water.
  • Putting chlorine sticks or tablets in the skimmer basket is a common mistake. Keep the skimmer and line basket clear of debris and don’t add pool chemicals through the skimmers as this erodes the pump impeller.
  • Check your flow meter frequently to be sure the pool is circulating water at a proper flow rate.
  • Brush the walls and floor weekly.
  • Shock the pool on a regular basis. Swimmers and the environment add waste to the pool that must be eliminated continually to prevent problems such as algae and cloudy water. Aqua Chem Shock Xtra Blue (available at GNH) keeps your water clear and kills any algae that may be growing.
  • Algaecides act as a backup to your normal sanitization program and prevent algae from starting and growing in the pool. Algaecide should be added after every shock treatment.

Follow these basic steps and you will be able to enjoy your pool all season long. Happy summer!

The Importance of Feeding your Dog or Cat a Well-Balanced Diet

We know what is good and bad for own diets, but what about feeding your dog or cat a well-balanced diet?

Our cats and dogs are our family members, and with that they should be fed quality, well-balanced food that nourishes them. Quality food will:

  • keep your pet’s coat shiny and sleek
  • strengthen his or her immune system
  • and keep his or her digestive system working properly

The best pet foods have real animal proteins as the very first ingredient such as venison, turkey, whitefish, or another type of meat, poultry, or fish. Taste of the Wild pet food uses the highest quality grain-free formulas that are based on their ancestral diet. Here are some main ingredients that you will find in our pet formulas and how your pet benefits from them:

Browse pet products at GNH!

Continue reading

gardening

Calling All Green Thumbs! Let’s Get This Garden Started

gardening

Are you ready to roll up your sleeves and get serious about making your garden sensational the season? Let GNH Lumber help get you started on the path to perfection. You can cultivate the garden of your dreams – and have fun doing it!

GNH has everything you need to break ground and get the garden fenced off right!

woman gardeningFrom colorful pots and planters, to decorative garden accessories, Bloem has something unique for every gardener of every age. Their planters not only get the job done, but they provide a splash of personality to any space.

Bloem’s Lucca planters come with an attached basin, so you only have to water from the top down until the root system is established, making growing easy. Make summer easier with self-watering planters that can help plants survive in drought conditions!

How do you do it? Here are the 3 easy steps:

Step 1:

Fill your Bloem Lucca planter with soil and plant your arrangement of live goods as you would normally.

Step 2:

Water plant from the top of the planter until the root base is established. (This will allow for the root system to grow into the watering tray. In the meantime, the watering tray will act as a regular saucer capturing excess water).

Step 3:

Once the root system is established (3-4 weeks), fill watering tray with clean water or fertilizer enhanced water. Root system will wick the water up for proper hydration. Once tray is empty refill as necessary!

Need seeds to start things off? GNH is happy to support and distribute Bentley Seeds for the gardening season. Bentley Seeds are developed specifically for our geographical region, so you are likely to get great growing results. And they come with easy growing instructions – even for those small garden spaces.

Added bonus: Bentley Seeds has a Give & Grow Program – with every retail packet you purchase on their website, Bentley Seeds will send a packet to a community garden or charity.

Come browse our expanded selection and get inspired!

painted kitchen

Transform Your Kitchen or Bath with Color

painted kitchen

If you’re considering an updated kitchen or bath for your home, but are working within a limited budget, consider how colors can transform your kitchen or bath without requiring any major renovations.

Bright, vivid walls of color can add impact, set a mood, create a focal point, enlarge a space, or make it feel more cozy. You can also use neutral or restrained colors to create a tranquil environment, or accentuate artwork and fixtures. Paints can also harmonize with your cabinetry (see blue kitchen image at right), or contrast against an architectural feature.

Get your painting project started!

This month, GNH Lumber is highlighting Benjamin Moore Natura paints, a healthier interior paint with zero VOC, zero emissions, and zero harsh fumes, making it a safer paint for your family and the environment, all without compromise to performance or color selection.

If you’re thinking about applying a fresh coat of paint to your kitchen or bath, consider these color schemes:

Southern Charm:

IA_int_bath_kohlersoutherncharm_540x395
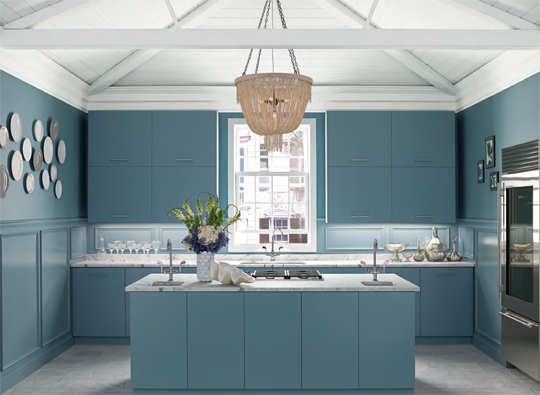
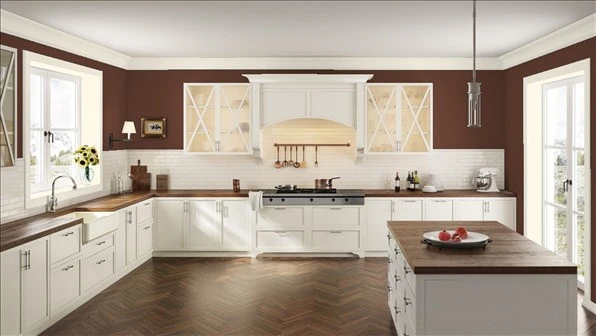
Inspired by the rich, distinctive architecture of historic southern towns, this elegant design palette pulls together soft pinks, saturated blues, and cloudy grays—along with sparkling details for a sophisticated look that can be customized for any home.

In this bathroom, the walls and panels are painted in Fruit Shake 2088-60 using Aura® Bath & Spa.


Eastern Mist:

eastern mist bath
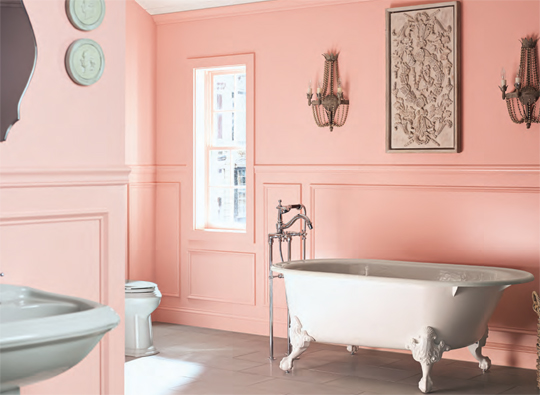
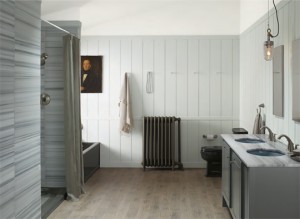
Inspired by the swelling blend of misty blues that line the sea and sky along the eastern seaboard, this beautiful palette features pale greens and blues. Light earthy tones add to the fresh, tranquil feel. In this bathroom, the walls are painted in Wickham Gray HC-171 using Aura Bath & Spa. The ceiling is painted in Frostine AF-5 using Waterborne Ceiling Paint.


Northern Roots:

IA_int_ktch_kohlernorthernroots_540x395
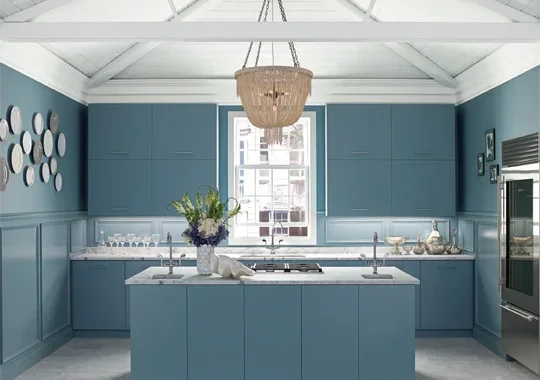
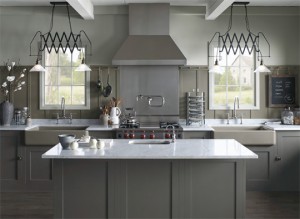
Inspired by the wondrous beauty of a well-worn, wind-beaten farmhouse, this palette features rich grays and taupes along with deep, complex neutrals. In this kitchen, the walls are painted in Stonington Gray HC-170 using Aura Interior in a matte finish. The cabinets are painted in Iron Mountain 2134-30 using ADVANCE® in a satin finish.


Garden Fence

Building A Fence For Your Garden

Now that it’s time to start planting for your garden it’s also time to make sure that you keep those animals and pests out by building a fence. All you will need is some poultry netting and fence posts- both of which are on sale this month at GNH, so not only can you start building, but you will be getting a great price on your supplies! Follow these easy steps and you will have your garden fence up in no time.

Determine where you want the fence, and how much fencing you will need. Keep in mind that your posts should be about 6 feet apart, so you will need to figure out how many posts you will need as well.

Once you have all of your supplies, push the posts into the ground by stepping on the fin at the bottom.

Sell_T_Fence_Post_Star

Line your roll of chicken wire up with a corner post and slip the horizontal wires along the second column of wire cells into the tabs on the posts.

HT_PG_BM_BWF_Body_Img-wire-faster-02

Next, unroll the wire and stretch it to the next post, ensuring the wire is taunt and level.

build-best-wire-fence-professional-steps-HT-PG-BM-hero

Hook the wire to the post in the same way you did on the first post, and continue this process until you wrap all the way around to your last post. You can even  hammer in the tabs to ensure the wire doesn’t come out.

mesh-fencing-squ jpg

Cut the chicken wire with wire cutters evenly down the edge, leaving a few inches beyond your last wire column.

It’s that simple!

Shrub Cover

The time it will take to build this will vary between 30-90 minutes.

Tree/Shrub Cover Kit

The following are tools and supplies needed to complete your tree/shrub cover project.
Stop into your local GNH Lumber and pick up any items that you may need.

Supplies
  • 1X4 Pine boards nominal size 3.5″ wide by 3/4″ thick (14CP)
  • Box of #6×1 (H40816) wood screws for small sizes or #8×1 for large sizes.
  • Pair of strap hinges. (H851662)

Tools
  • A corded or cordless drill or the Gyro by Black & Decker
  • 1/16″ or 5/64″ drill bit
  • A #2 Phillip’s head with magnetic bit holder
  • Tape measure
  • Pencil
  • Framing speed square
  • Handsaw or circular saw (a miter saw works as well)
  • For safety we recommend safety glasses and leather gloves. Nothing is worse the getting wood dust in your eye or friction burn on your fingers driving wood screws!

Plan and Build Your Shrub Cover

Step 1

First, decide that size or sizes or tree/shrub coverings you want. Then, bring your list of material needs and measurements for the wood to GNH Lumber and we will be happy to help you with your tree/shrub cover needs. We recommend trying to maximize your measurements with the ability to transport your wood home in your vehicle. GNH Lumber does offer delivery for a nominal fee of $35.00

Step 2

GNH can cut your boards for you to the nearest full inch, we have a $1.00 fee per cut. Be sure you have the right length as cut products are not returnable to GNH Lumber.

Begin by putting on your safety glasses. Measure your 1×4 pine boards to the length you wish to cut (our demo was 18″). Remember to measure one last time before you cut. Use the framing speed square and pencil to get a nice clean straight line across your 1×4 for your cut. Cut your 1×4 to get all of your vertical pieces. Most covers will have eight pieces.

Step 3

Next, get ready to cut your horizontal pieces. Take one last measurement, then use your framing speed square and pencil to mark where you will cut. Cut your horizontal pieces to the length you need. Save your scarp pieces of 1×4! These will come in handy when getting the spacing between boards to match. Stack your vertical pieces together to make sure they all came out the right length. Adjust accordingly if you desire.

Step 4

Shrub Cover Step 2

On a flat surface, lay your 1×4 vertical pieces out side by side. Use one of your scrap 1×4’s for spacing between the boards (using the 3/4″ thick side), and use your framing speed square to make your first piece straight. Take one of your horizontal pieces and lay it on top of the vertical 1×4’s perpendicular (at a 90-degree angle). Get your drilling device of choice. Remember if using a cordless drill be sure that you have a freshly charged battery it will be easier to drill your pilot holes and drive your wood screws. Load your drill bit of choice in the drill.

Step 5

Shrub Cover Step 3

If unsure that your drill bit is long enough, compare the drill bit on the edge of 1×4 to see if the bit will be long enough to get to the lower 1×4 board before you drill. When drilling, most drills have a “drill” setting. Set to drill. Be sure you are at least 3/4″ from any edge. When you drive the screw the wood may still split.

Step 6

Shrub Cover Step 4

Firmly hold the two pieces down, plunge the drill bit into the top 1×4 and proceed down so it penetrates into the lower board a bit. Switch the drill to reverse, pull trigger and extract. Repeat this process in a zigzag pattern; making two holes in each vertical piece and three on the two outer pieces.

Remove your drill bit and put in your magnetic bit holder with the #2 phillips bit. Open your box of #6 or #8 x 1 wood screws. For safety keep your safety glasses on and put on your leather gloves. Take your drill off of the “drill” setting. We recommend a driving speed of 14. Put your screw on the phillips bit and firmly push the screw into the pilot hole and squeeze the trigger, keep the drill as straight as possible and drive the screw down a little past the face of the 1×4. Repeat this step on the other three horizontal pieces.

Step 7

Shrub Cover Step 5

Your panels are now together. Open your strap hinge package and choose which will be the top or your cover. Place both hinges down on the horizontal 1×4 line up to make sure the hinge screw won’t land on one of the other screws. Mark the locations with your pencil. With your drill and drill bit drill, pilot holes for the hinges. When you are done, place the hinges back over the pilot holes and drive the screws into the holes. When this is complete, place another panel next to hinges and repeat the process.

Step 8

Shrub Cover Step 6

Once all are finished, lift up your new tree-shrub cover, opened like an “A”, and admire your handy work!

Shrub Cover Step 7

American Flag Pallet

Do you love the American Flag? You can easily make a very nice flag from a wood pallet.

Directions:
1. Cut the pallet in a little if you want to have a more flag shape, or leave it whole like this one! Pallets come in all shapes and sizes, so cut it how you want.
2. Fill in any holes or damages with the wood filler, sand it with an orbital sander, or leave it rustic if you like.
3. Prime the front side of the palette
4. Using the blue painter’s tape, tape off the blue stars part of the flag and the white stripes.
5. Paint the red stripes.
6. Take the tape off the blue section and paint it blue. Let it dry overnight.
7. Print out a picture of a Star and cut it to create a stencil. Paint the White stars over the blue area.
8. Hang the Flag!

WHAT IS NEEDED FOR THE JOB
Supplies
  • 1 Wood Pallet
  • Nails
  • Sand paper
  • Masking tape
  • Primer
  • Paint – Red/White/Blue
  • Varnish
  • Wood Filler (optional)
Tools
  • Saw
  • Orbital sander (optional)
  • Hammer
  • box cutter
  • Printer
  • Ruler
RELATED LINKS